Creating and Testing a Web Service
The theme of this document is to design and create a simple web service.
The web service will deliver data to requestors. The data will be materialized in the app (i.e. as JavaScript objects). A future "version 2" web service will use a database.
Confirm that your tooling is ready
Before writing and running the app, confirm that your computer's tooling is ready.
If your system does not yet have the Node.js app dev ecosystem
Install Node.js (which also installs npm). Verify its status:
node --version
npm --version
If your system does not have the developer tools
- Install git
- Install more browsers (assume that Safari is already there; add Chrome, Firefox, and Opera)
- Install Visual Studio Code (aka VS Code)
Create a project to hold the web service
Using Terminal, navigate to the file system location that will hold the project. Create a new folder to hold the project.
Navigate into that folder. Create an empty server.js file. Create an empty index.html file. It's also a good idea to create an empty README.md file.
Now, initialize the folder as a Node.js app:
npm init
Make sure you specify server.js as its entry point. Add your name as the author name, and add a description if you wish. The other settings can stay at the suggested default values.
Add Express.js:
npm install express
Now, edit the project.
code .
Open the server.js file for editing. Make it do something. For example:
console.log('Hello, world!');
Back in Terminal, run the app:
node server.js
It should respond with the console message, and then terminate.
Write a simple web server
Our goal is to create an app that will handle these requests:
- Get all
- Get one
- Add new
- Edit existing
- Delete item
This goal will work for a web service that handles ANY kind of data. Obviously, a more complex data model will have more request handlers, but they all share the same core design, and handle these five - or variants of these five - requests.
The core getting-started code looks something like the following.
// Setup
const express = require('express');
const path = require('path');
const app = express();
const HTTP_PORT = process.env.PORT || 8080;

// Add support for incoming JSON entities
app.use(express.json());

// Deliver the app's home page to browser clients
app.get('/', (req, res) => {
  res.sendFile(path.join(__dirname, '/index.html'));
});

// Get all
app.get('/api/items', (req, res) => {
  res.json({ message: 'fetch all items' });
});

// Get one
app.get('/api/items/:itemId', (req, res) => {
  res.json({ message: `get item with identifier: ${req.params.itemId}` });
});

// Add new
// This route expects a JSON object in the body, e.g. { "firstName": "Peter", "lastName": "McIntyre" }
app.post('/api/items', (req, res) => {
  // MUST return HTTP 201
  res.status(201).json({ message: `added a new item: ${req.body.firstName} ${req.body.lastName}` });
});

// Edit existing
// This route expects a JSON object in the body, e.g. { "id": 123, "firstName": "Peter", "lastName": "McIntyre" }
app.put('/api/items/:itemId', (req, res) => {
  res.json({
    message: `updated item with identifier: ${req.params.itemId} to ${req.body.firstName} ${req.body.lastName}`,
  });
});

// Delete item
app.delete('/api/items/:itemId', (req, res) => {
  res.status(200).json({ message: `deleted item with identifier: ${req.params.itemId}` });
});

// Resource not found (this should be at the end)
app.use((req, res) => {
  res.status(404).send('Resource not found');
});

// Tell the app to start listening for requests
app.listen(HTTP_PORT, () => {
  console.log('Ready to handle requests on port ' + HTTP_PORT);
});
Edit server.js
Edit server.js so that it holds the code shown above.
Make a simple home page (HTML)
Edit index.html. Use the html:5 Emmet snippet to help with this task.
Run the app
In Terminal, run the app.
Testing our API using the Thunder Client Extension
Thunder Client is a Visual Studio Code extension that enables web programmers to interact with a web service (aka web API) without the need to install additional software.
This kind of extension enables us to focus on web service creation - which is a server-focused development effort - without the additional burden of creating a separate client/requestor app that interacts with the web service. It is the client app as we test and interact with the web service.
Its user interface gives us the ability to "compose" a request. Then, we can send the request. Finally, we can inspect the response. The extension saves a history of requests, making it easy to see that you're making progress.
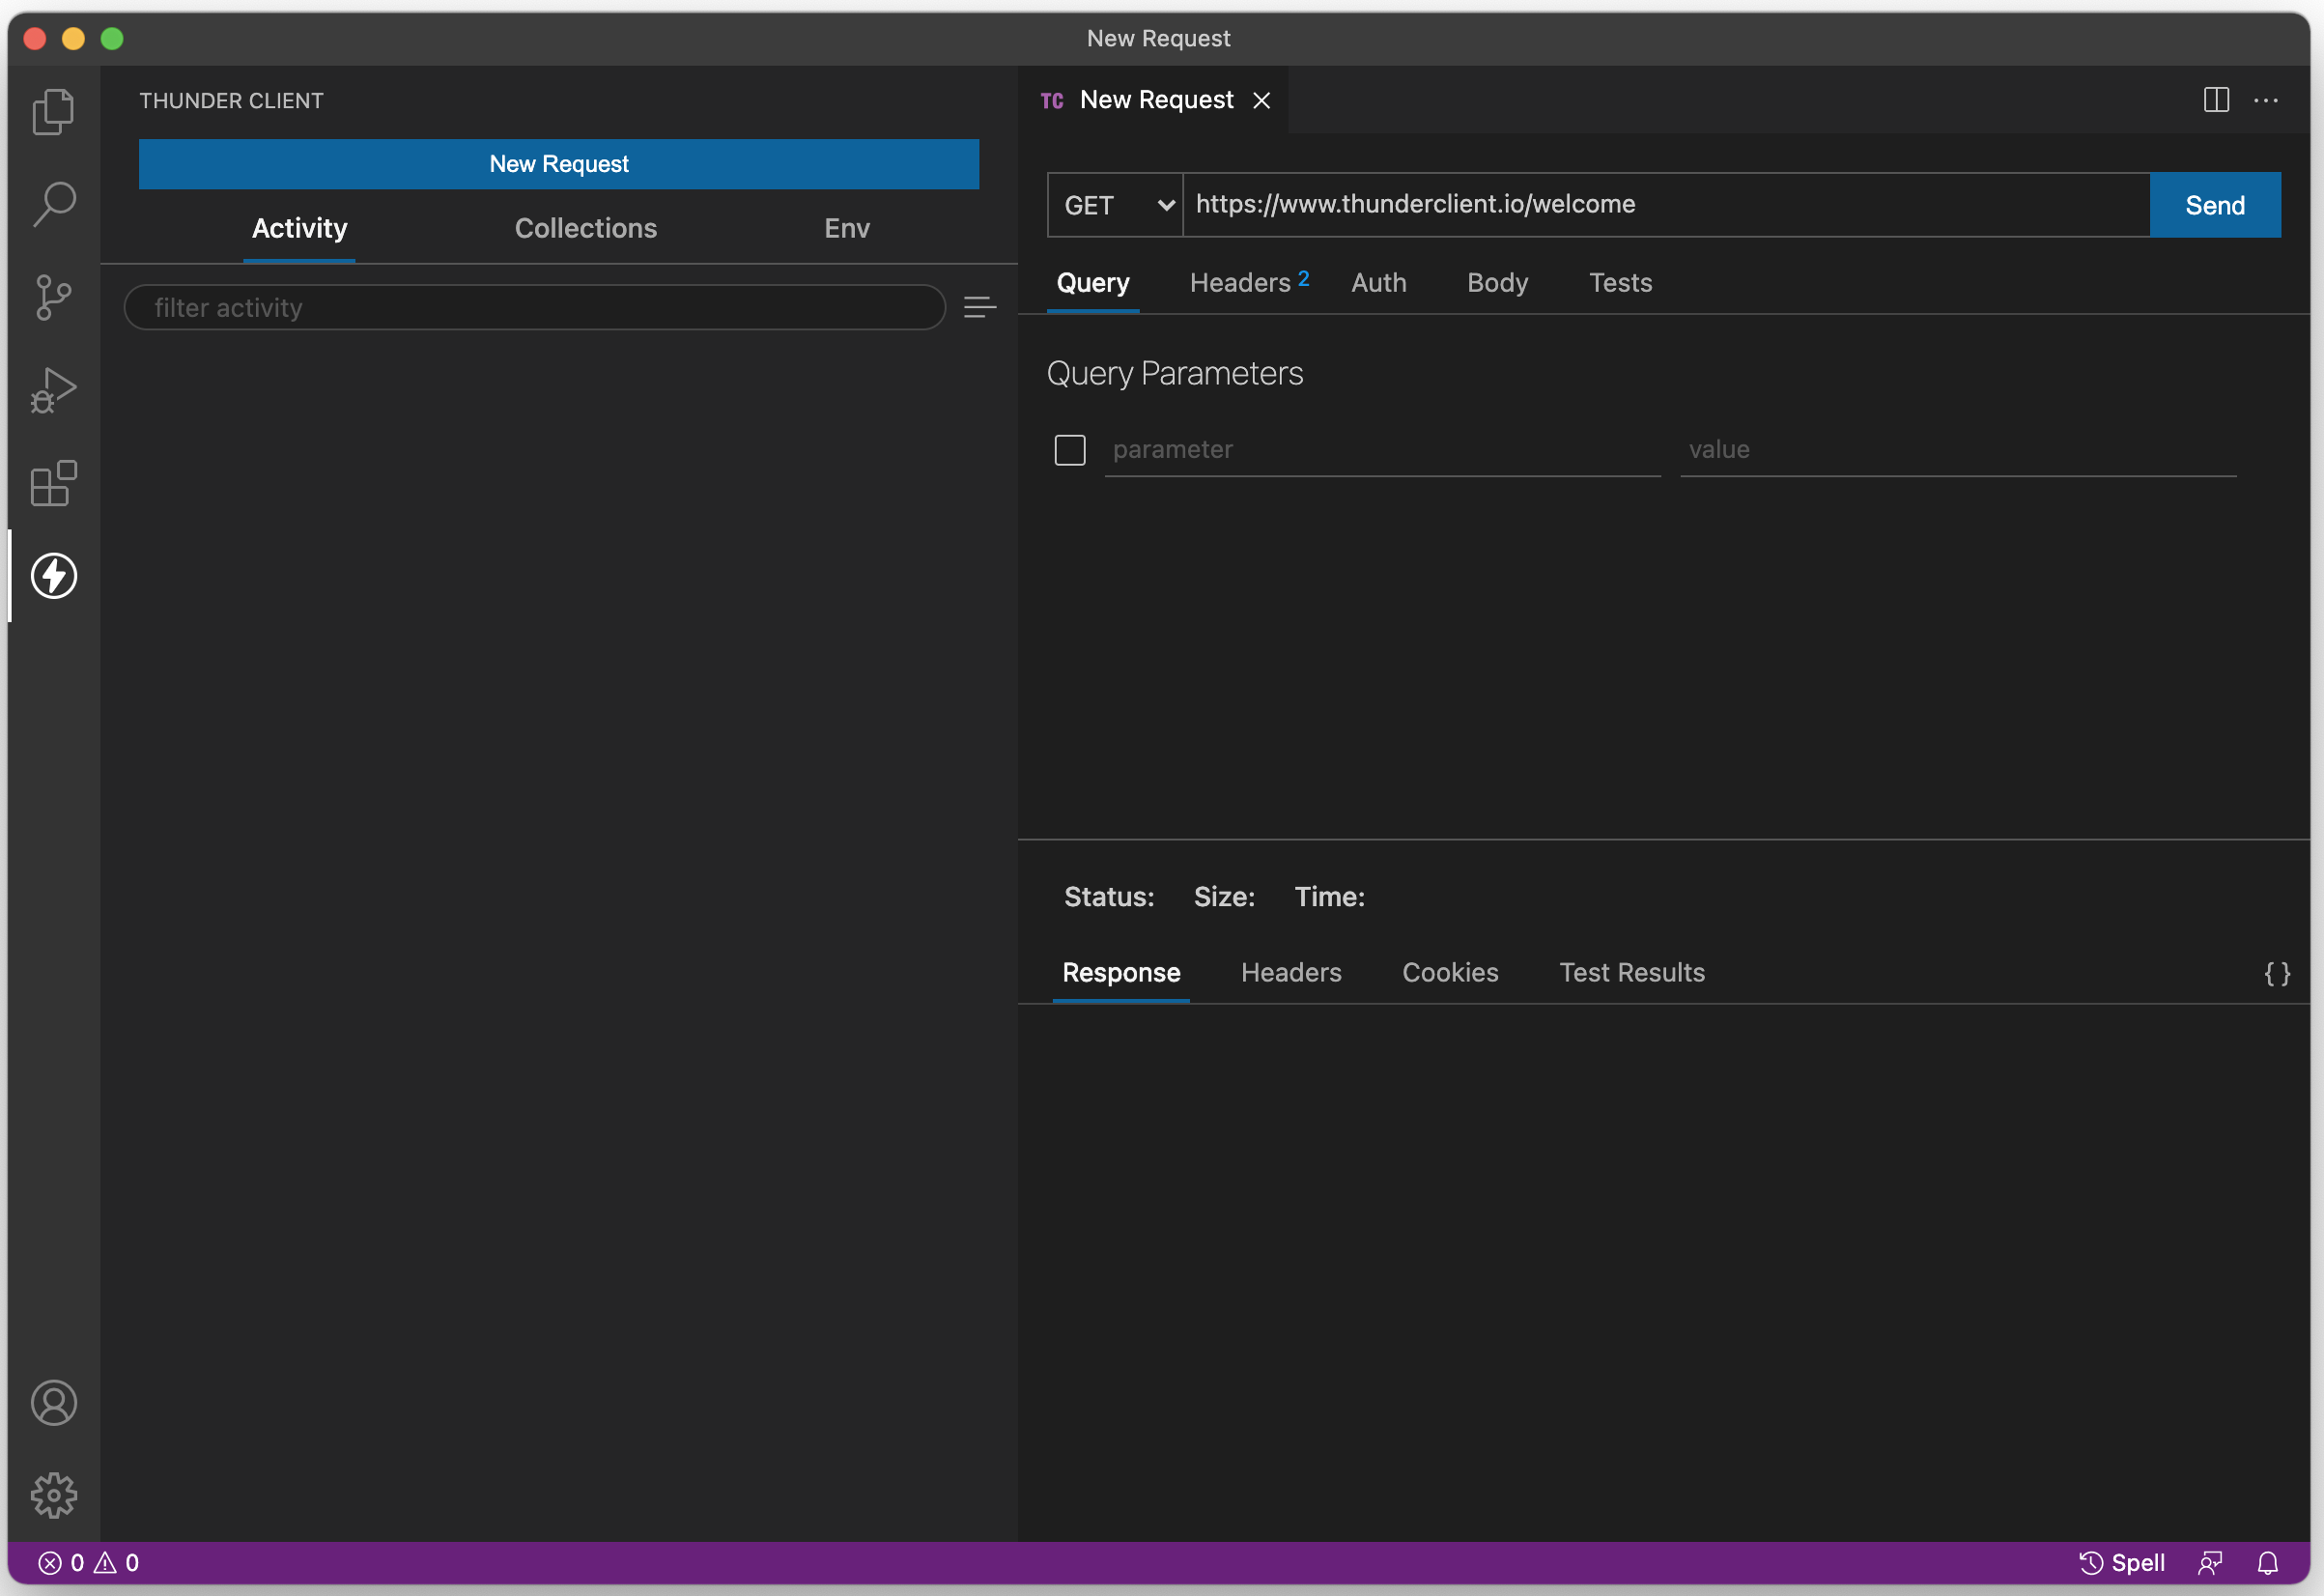
Start Up
After installing the extension, you can get started by clicking on the new "thunderbolt" icon in the left sidebar. This should show you the following screen, with the option to create a new request.

Important features
Once you click the "New Request" button, you will notice that the screen is populated with additional information. For beginners, there are two important features:
- Request and response areas - enables you to inspect the contents of both the request and the response (right pane)
- List of past requests - saves all requests as a history under the "Activity" tab (left pane)
What is an HTTP request?
As you know, HTTP is a message-passing protocol, between two endpoints. One end will send a request, and the other will send a response.
The requester can be a browser (which is what all students have experience with), or it can be a component in an app. For example, almost every smartphone app includes a component - generically known as an HTTP client - that enables it to communicate with a web service.
HTTP defines several kinds of requests. At a minimum, a simple "get me some data" request must include the HTTP method (e.g. GET, POST, etc.), and a URL. Other kinds of requests must include other metadata.
Remember, RFC 7231 is the authoritative resource for the HTTP protocol.
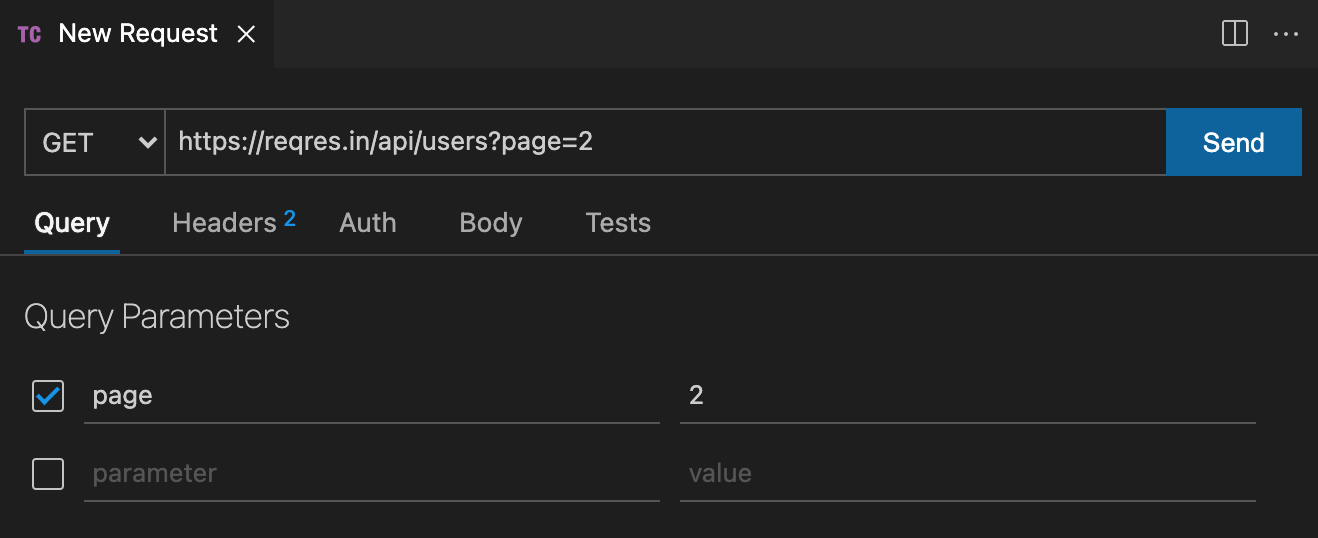
Compose a request - GET
To compose an HTTP GET request, two settings are required:
- HTTP method, GET
- URL of the collection or object
Other settings may be required (e.g. security-related info, etc.), and we'll see those in the future.
Compose a request - POST
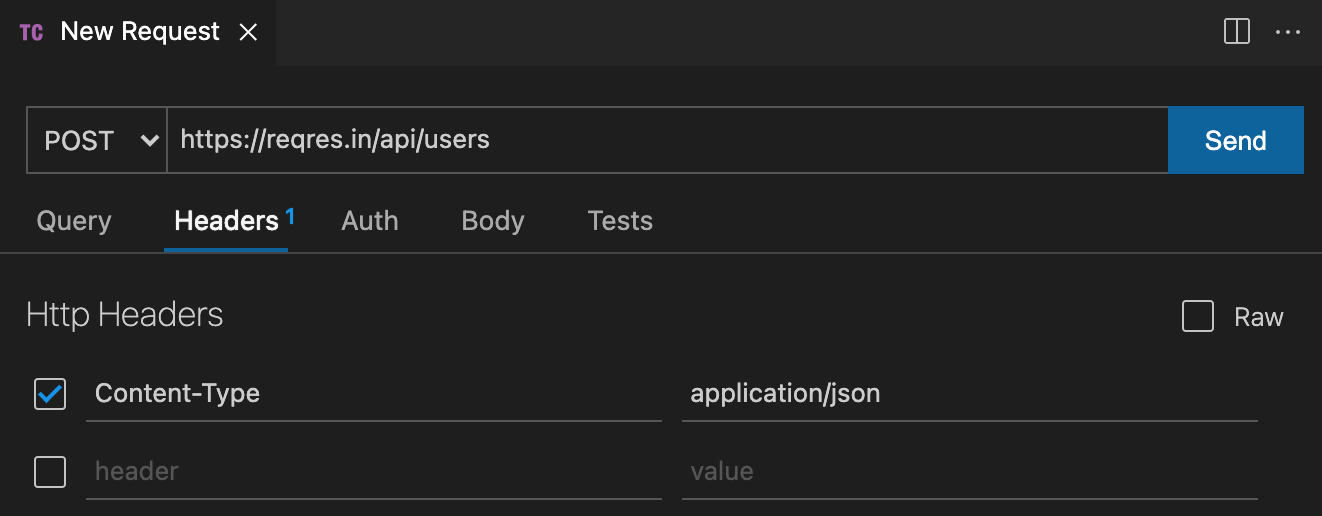
A POST request is designed to enable the requestor to "add" a new item to the collection that is represented by the URL. Obviously, when compared to a GET request, more is required.
To compose an HTTP POST request, four settings are required:
- HTTP method, POST
- URL of the collection
- A header that defines the content type of the data we're sending
- Data (the new item)
As above, other settings may be required, but these will enable you to get started.
The image below shows a simple post request, with metadata for the first three settings. Notice that you must select the "Headers" tab to get to the data-entry panel. The header we want is Content-Type, and its value will be application/json, because that's what we're sending
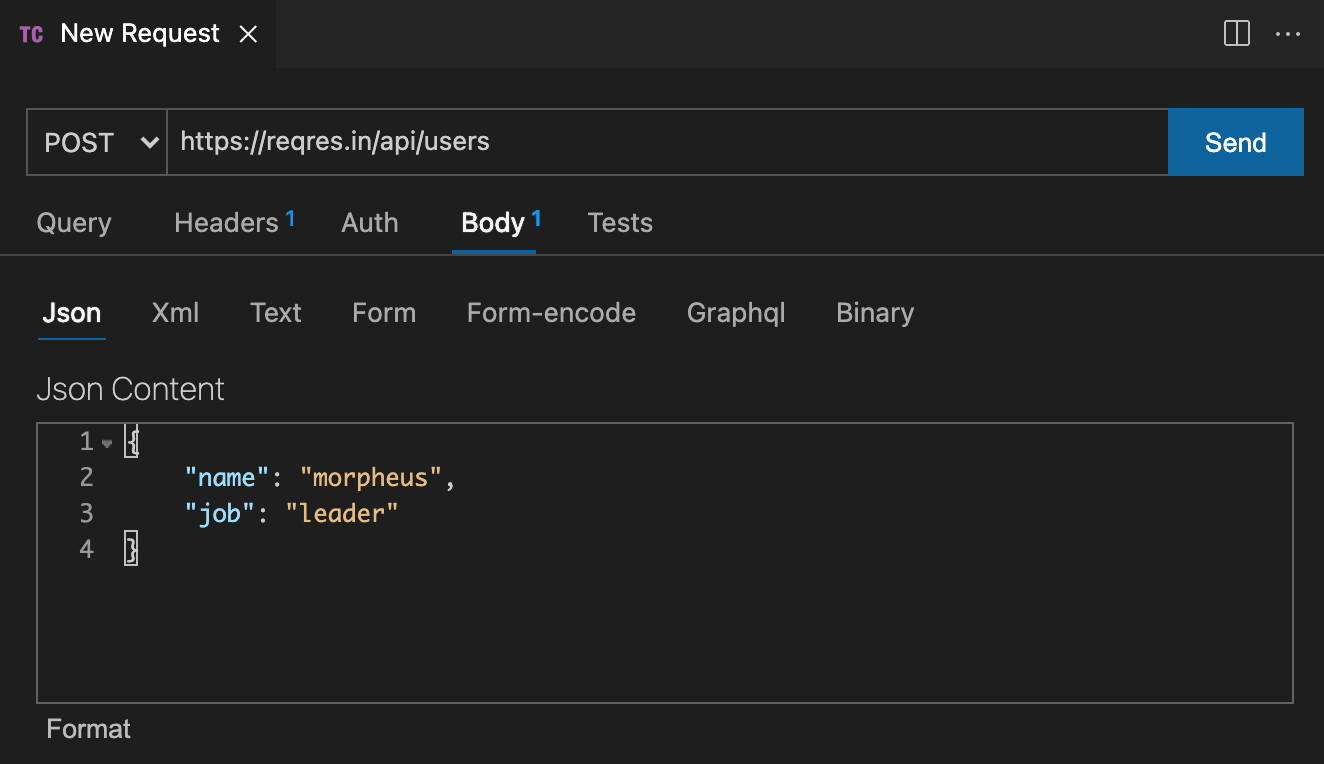
The image below shows how to enter metadata for the fourth setting. Select the "Body" tab and then in the text entry area, add the JSON that correctly defines a new item for the collection.
More about Thunder Client
The official help docs on Github will enable you to become more comfortable using the extension:
Add some data (simple arrays)
You obviously noticed that the server's functions were not really handling any data. The requests and responses were simple strings. We'll change that now, and use real data.
We have to do two tasks:
- Add some data
- Edit the functions
Add simple string data
Let's add a super-simple array of strings, for example the names of colours. Somewhere in the server.js file, create a variable to hold the data, something like this:
// Array of strings
let colours = ['Red', 'Green', 'Blue', 'Yellow', 'Aqua', 'Fuschia'];
Change the "get all" function, and this time return the data.
What about the other functions? Yes, they need some work.
If we assume that itemId is the array element or index, then we can code a "get one". For example, the function body looks like the following:
// Extract the item identifier
let itemId = req.params.itemId;
// Make sure it's valid
if (itemId > colours.length) {
  res.status(404).send('Resource not found');
} else {
  res.json(colours[itemId]);
}
Next, if we assume that we pass in a simple JSON object with one key-value pair (and the key name is "colourName"), then we can code an "add new". For example, the function body looks like the following:
// Extract the incoming data from { "colourName": "Purple" }
let newItem = req.body.colourName;
// Add another item to the array
colours.push(newItem);
// Return the result; RFC 7231 tells us that it must return HTTP status 201
res.status(201).json({ message: `added ${newItem} as item identifier ${colours.length}` });
Add some data (objects)
We will leave this as an in-class hands-on task (in our computer-lab session).
Generate a substantial amount of data
One of the new skills that a web programming student should add is the ability to generate and use a large amount of data. This is especially important for web programmers, because the result of the work we do is so visual in nature. It is always a good idea to use and show good solid credible data, instead of the simple placeholder data (e.g. abc, 123, foo, bar, etc.) that is so common in entry-level programming work.
Here, we will introduce you to, or remind you about, the Mockaroo service:
Need some mock data to test your app?
Mockaroo lets you generate up to 1,000 rows of realistic test data in CSV, JSON, SQL, and Excel formats.
Problem solved.
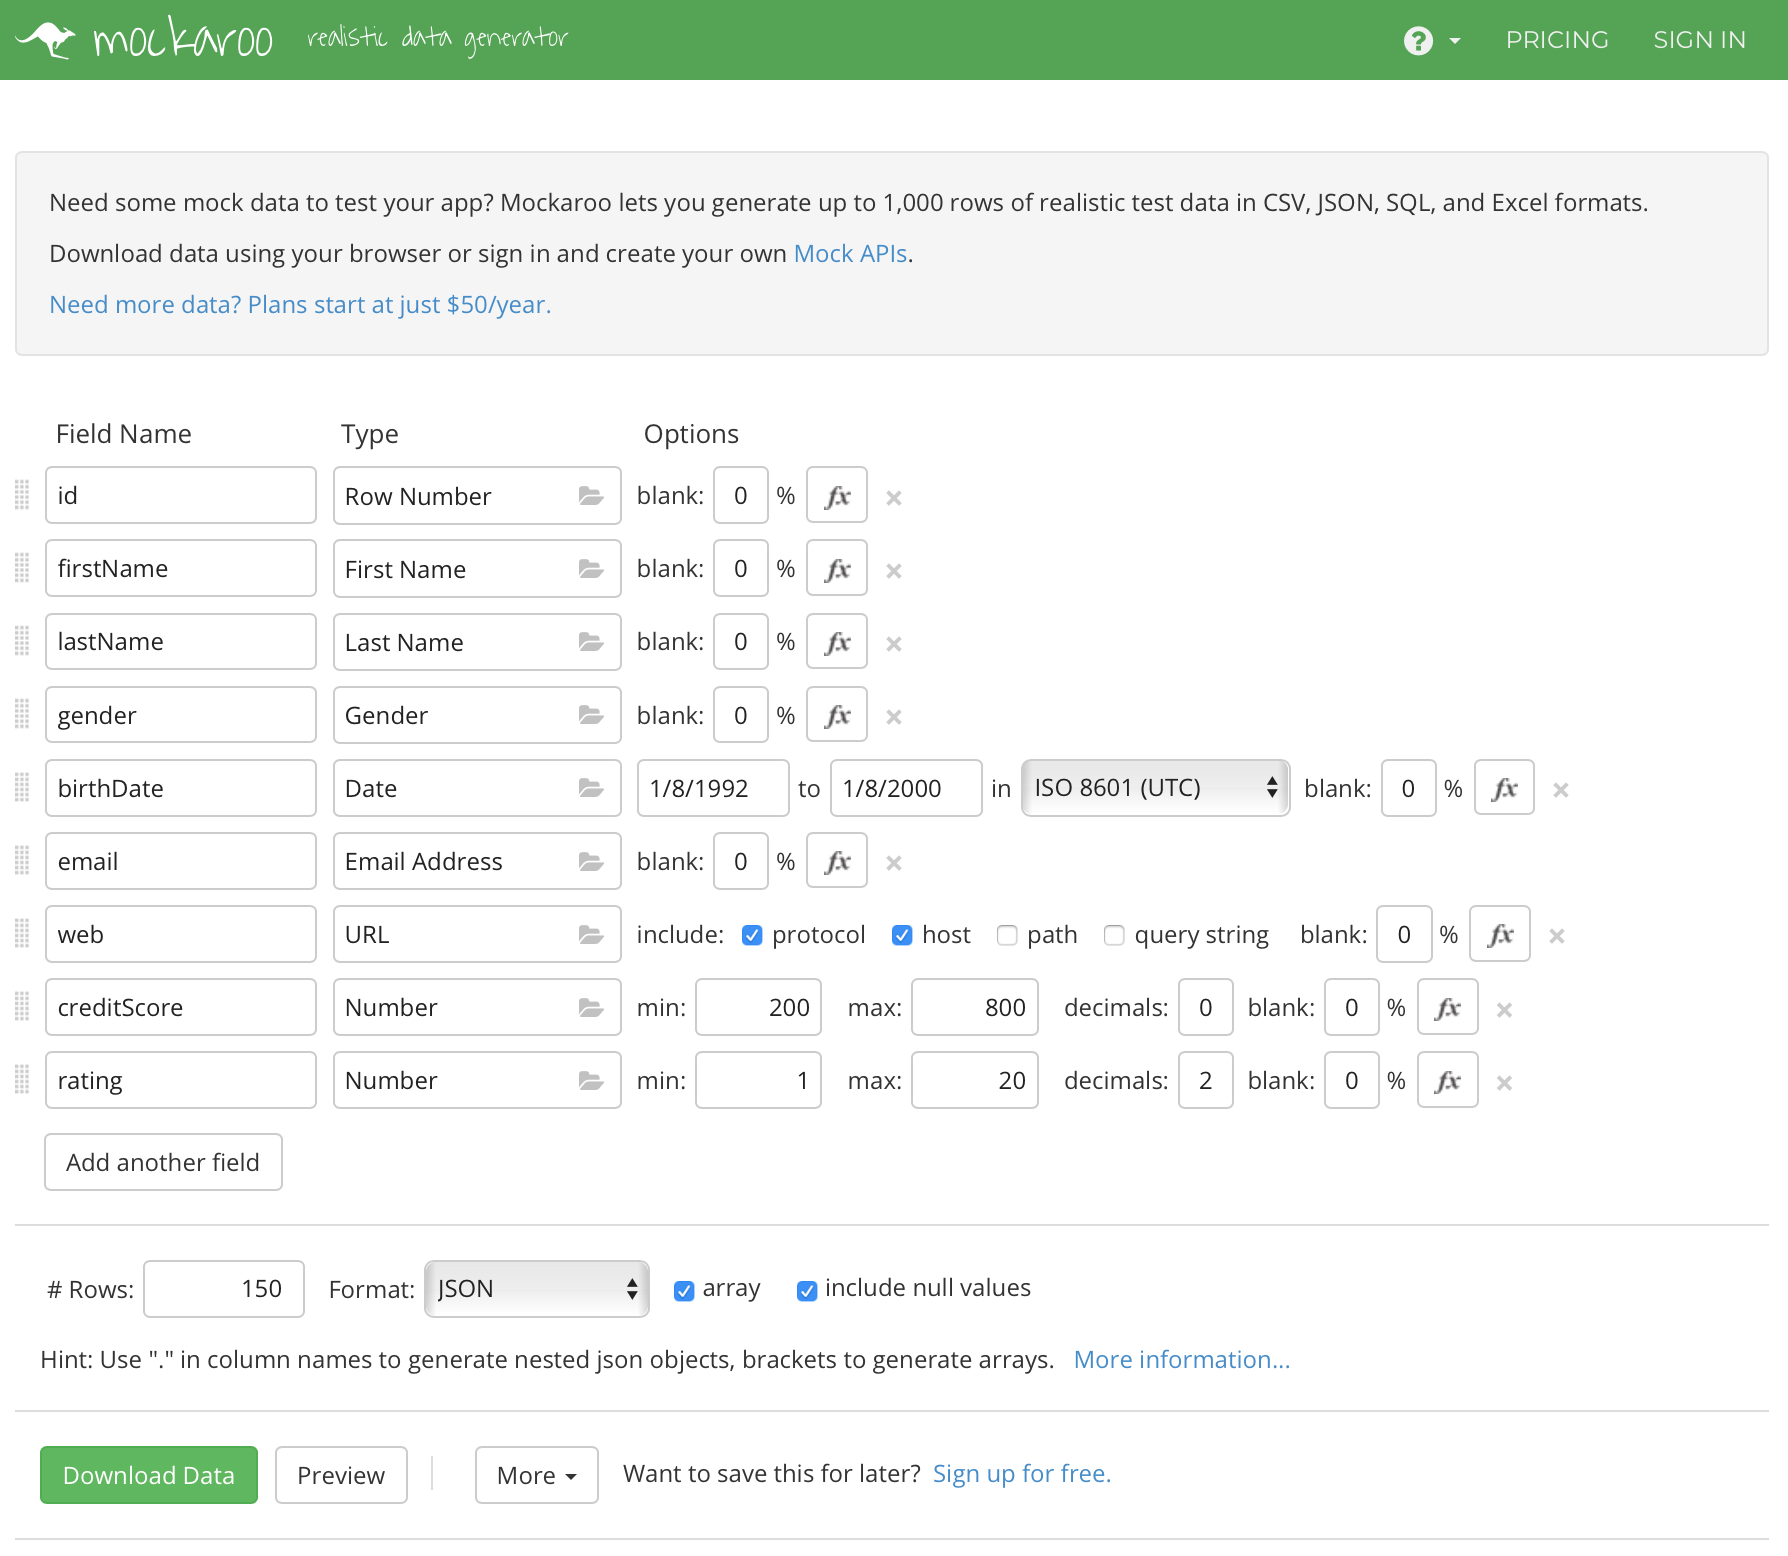
Generate some data. Make sure you configure enough fields to give you a rich variety of data. For the professor's in-class demonstration example, here are a few notable choices we made:
- Birth date was within a range and in ISO 8601 format
- Credit score was an integer within a range
- Rating was a number within a range with two decimal places
- 150 rows were returned
- Data format was JSON
Here's a screen capture. (Right-click and then open it in a new tab/window to see it full size.)
Use the data in your web service
The data comes to your system as a standard download. Open it for editing. Copy it.
In your code, similar to what you did above, assign the JSON as the value of a new variable.
let people = // your pasted JSON goes here
Don't forget the statement's trailing semicolon.
Now you have a rich body of data, with which you can do the standard get all, get one, add new, edit existing, and delete item tasks.
Update the code in the functions
Obviously, the code in the functions needs updating, to work with the new data.
Get all is easy to fix.
If you want sorted data - for example by last name then first name - more work needs to be done. The built-in JavaScript array sort() function mutates the existing array. Maybe that's not such a good idea. Therefore, before sorting, copy the array to a new array, with something like this:
let c = data.map((p) => p);
Then, the "c" array can be mutated, with something like this:
c.sort(function (a, b) {
  return a.lastName.localeCompare(b.lastName) || a.firstName.localeCompare(b.firstName) || 0;
});

// or, using arrow function syntax...
c.sort((a, b) => {
  return a.lastName.localeCompare(b.lastName) || a.firstName.localeCompare(b.firstName) || 0;
});
Finally, the sorted "c" array can be returned.
Do you want to sort an array of numbers?
The "compare" is an arithmetic subtraction compare.
Look at the MDN docs for more, but briefly:let numbers = [4, 2, 5, 1, 3];
numbers.sort((a, b) => a - b);
Or, if the numbers were in a property of an array of objects:
// assume the array "c" of people/person objects
// and we want to sort on credit score
c.sort((a, b) => a.creditScore - b.creditScore);
Get one is also relatively easy to fix.
Compared to the "colours" array above, where it was easy to "find" the value we wanted, this "people" array has objects as elements in the array. We want to support finding a matching identifier (i.e. the "id" field).
This needs a function (an arrow function, specifically). For example:
let o = data.find((p) => p.id == itemId);
Then, if "o" is "undefined", return HTTP 404. Otherwise return the object "o".
You can do the others on your own (i.e. add new, edit existing, delete item). Doing this will remind you of your work with JavaScript arrays, and enhance those skills.
Looking for a more challenging task?
Try adding another function to handle a request for people with a high credit score (e.g. a creditScore value over 600). We can suggest the filter() function can help with that.
Try adding another function to return only the full names of the people objects. We suggest the map() function can help with that. (Bonus, sort the results.)
Try adding another function that will enable a find by last name (case insensitive).
Doing these additional tasks will prepare you for more interesting work with data and its transformations.
Enjoy!