Continuous Integration
You have likely seen the acronym "CI/CD" used when describing modern application development. In this context, it stands for "Continuous Integration / Continuous Deployment" and is a vital technique in ensuring software quality and quick delivery. To begin, we will first discuss "Continuous Integration", which Atlassian defines as:
The practice of automating the integration of code changes from multiple contributors into a single software project. It’s a primary DevOps best practice, allowing developers to frequently merge code changes into a central repository where builds and tests then run. Automated tools are used to assert the new code’s correctness before integration.
A source code version control system is the crux of the CI process. The version control system is also supplemented with other checks like automated code quality tests, syntax style review tools, and more.
Notice how a "source code version control system" was mentioned as a vital part (the crux) of the process. Therefore, to get started using Continuous Integration, we must be familiar with such a system. Fortunately, there is a widely used version control system that is free to use: GitHub.
Git / GitHub Review
If you have ever "pushed" code to GitHub, you are likely familiar with some of the common "git" commands:
NOTE: If you do not currently have "git" installed on your system (verified using the command:
git --version), you can install it using the instructions here.
git init: Initializes a brand new Git repository and begins tracking an existing directory. It adds a hidden subfolder within the existing directory that houses the internal data structure required for version control.
git init
git clone: Creates a local copy of a project that already exists remotely. The clone includes all the project's files, history, and branches.
git clone git://git.kernel.org/pub/scm/.../linux.git my-linux
cd my-linux
git add: Stages a change. Git tracks changes to a developer's codebase, but it's necessary to stage and take a snapshot of the changes to include them in the project's history. This command performs staging, the first part of that two-step process. Any changes that are staged will become a part of the next snapshot and a part of the project's history. Staging and committing separately gives developers complete control over the history of their project without changing how they code and work.
git add .
git commit: Saves the snapshot to the project history and completes the change-tracking process. In short, a commit functions like taking a photo. Anything that's been staged with git add will become a part of the snapshot with git commit.
git commit -m "initial commit"
git status: Shows the status of changes as untracked, modified, or staged.
git status
git remote: Manage the set of repositories ("remotes") whose branches you track.
git remote -v
git checkout: Switch branches or restore working tree files (the -b flag creates a new branch before switching to it)
git checkout -b new-feature
git branch: Shows the branches being worked on locally.
git branch
git merge: Merges lines of development together. This command is typically used to combine changes made on two distinct branches. For example, a developer would merge when they want to combine changes from a feature branch into the main branch for deployment.
git checkout master
git merge new-feature
git pull: Updates the local line of development with updates from its remote counterpart. Developers use this command if a teammate has made commits to a branch on a remote, and they would like to reflect those changes in their local environment.
git pull origin master
git push: Updates the remote repository with any commits made locally to a branch.
git push origin master
For more information, see the full reference guide to Git commands.
To practice some of these commands, grab the example code for this week and open the "app-with-tests" folder in Visual Studio Code. Next, issue the command npm install to fetch the dependencies / rebuild the node_modules folder.
Hosting Your Code
Now that we have reviewed some of the basic "git" commands, it's time to host our code on GitHub. If you don't have an account on GitHub, create one now.
Create a GitHub Repository
Sign in to your GitHub account.
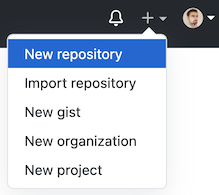
Find and click a "+" button on the Navigation Bar. Then, choose "New Repository" from the dropdown menu.
Fill in the repository name text field with the name of your project. Also, make sure that the "Private" option is selected:
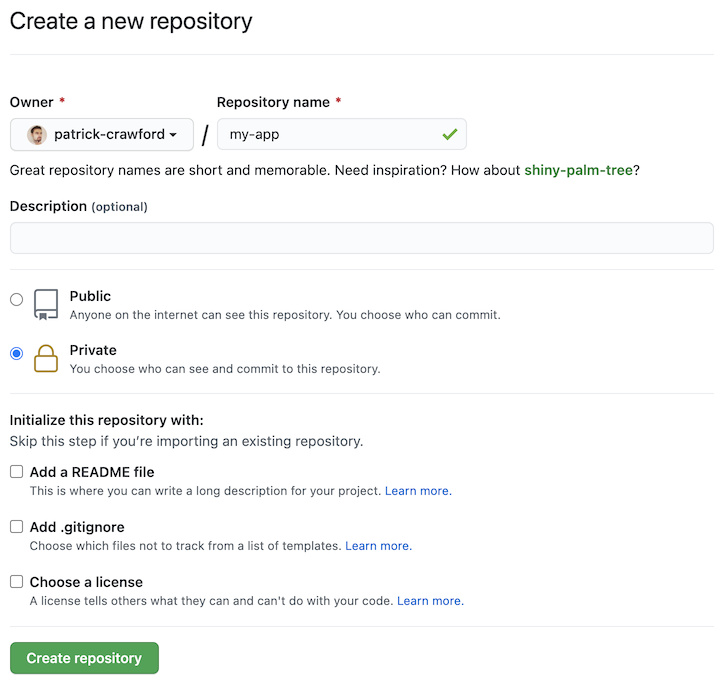
Once you're happy with the settings, hit the "Create repository" button.
Prepare Our Local Git Repo
Open the terminal and change the current working directory to your app.
You can run git status to verify that Git is set up properly. If you see fatal: not a git repository (or any of the parent directories): .git error message, then your local Git repository does not exist and you need to initialize it using git init.
Now that we're sure that our local git repository is set up, we need to add and commit all of our code changes:
- Add the files to the local repository by running
git add . - Commit the newly added files:
git commit -m "Initial commit".
Connect the Local Git Repository to GitHub
Go to your GitHub repository and click the "copy" button in the "Quick Setup" block:

This will copy the URL of your remote GitHub repository.
Now, go back to your Terminal again and add this remote URL by running the following command:
git remote add origin URL
where URL is the remote repository URL that you have copied in the previous step.
If you run git remote -v, you should see something like this:
origin  git@github.com:patrick-crawford/my-app.git (fetch)
origin  git@github.com:patrick-crawford/my-app.git (push)
Finally, commit your changes (if you have not yet done so) and push the code from your local repository to the remote one:
git push origin master
NOTE: Your default branch may be "main" - to confirm which branch you are on, execute the command
git status
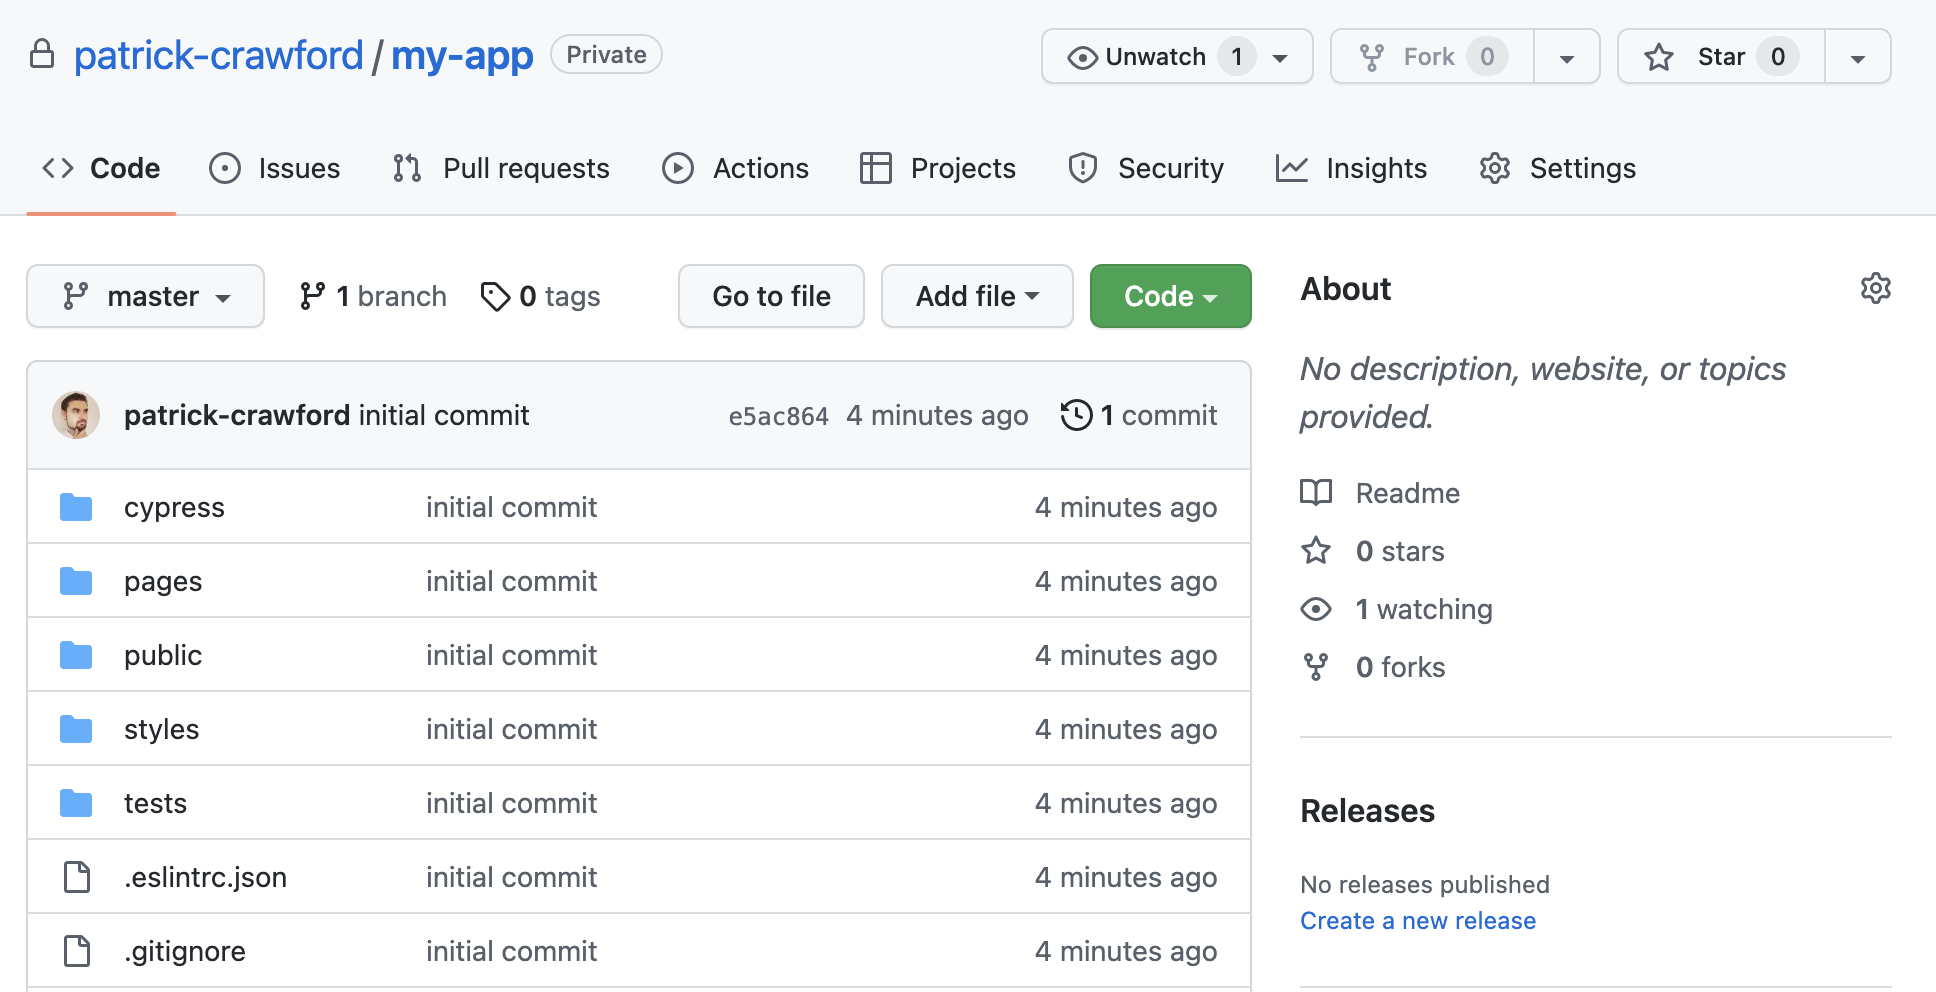
You can verify that the code was pushed by going back to your Browser and opening your GitHub repository.
Automating Tasks
GitHub has an amazing automation platform that we can use within our projects called "GitHub Actions":
GitHub Actions is a continuous integration and continuous delivery (CI/CD) platform that allows you to automate your build, test, and deployment pipeline. You can create workflows that build and test every pull request to your repository, or deploy merged pull requests to production.
GitHub Actions goes beyond just DevOps and lets you run workflows when other events happen in your repository. For example, you can run a workflow to automatically add the appropriate labels whenever someone creates a new issue in your repository.
GitHub provides Linux, Windows, and macOS virtual machines to run your workflows, or you can host your own self-hosted runners in your own data center or cloud infrastructure.
To get started using GitHub actions, we begin by creating a "workflow" that responds to an event. This involves creating the following starter file:
File: .github/workflows/ci.yaml
name: CI
on: [push]
Notice how we have named the file "ci.yaml", ie: "ci" for "continuous integration" and the ".yaml" extension for a "yaml" file: "a human-friendly data serialization language for all programming languages". You can think of it as an alternative to .json that is typically used for writing configuration files. The official documentation offers a "Reference Card" as a reference for the full syntax, however we will only be using a small subset of this - just enough to correctly configure our "ci" workflow. One of the major differences that you will notice right away is that that it uses whitespace instead of curly braces.
In the above file, we have two properties:
- The workflow name
- The event to trigger the workflow, in this case "push" defined in an array for the property on. By using a "push" event, the workflow will run whenever code is "pushed" to the repository using git push.
While this is enough to register the action for our repository on GitHub, it will not run as we have not defined any "jobs". As our first job, let's run a simple "lint" check using ESLint.
NOTE: Since version 11.0.0, Next.js provides an integrated ESLint experience out of the box (which we opted into when creating a new app). By executing the command "npm run lint" you can "lint" your code, which "statically analyzes your code to quickly find problems". This is an important step in CI, as we do not want any JS errors potentially breaking our build further down in the pipeline.
Add the following code to update the "ci.yaml" file:
jobs:
  run-tests:
    name: Lint and Test
    runs-on: ubuntu-latest

    steps:
      - name: Checkout code
        uses: actions/checkout@v4

      - name: Install packages
        run: npm ci

      - name: Run ESlint
        run: npm run lint
We have added quite a lot to the file, so let's discuss the purpose of each property before moving on and testing our workflow:
jobs: A workflow run is made up of one or more jobs, which run in parallel by default.
run-tests: The id of our job - notice it is "run-tests", this is because we will eventually be automating tests as part of our workflow
name: The name of our job, which will be displayed in the Github GUI
runs-on: Used to define the type of machine to run the job on, in this case we will use the extremely common "ubuntu-latest" (ubuntu 22.04 at time of writing) setting, however GitHub offers other GitHub-hosted runners, including: windows-latest and macos-latest, in addition to specific versions.
steps: A job contains a sequence of tasks called steps. Steps can run commands, run setup tasks, or run an action in your repository, a public repository, or an action published in a Docker registry. Not all steps run actions, but all actions run as a step.
NOTE the following properties are prefixed with a "-" character, to indicate that they are part of a Block Sequence
- name: Checkout code, uses: actions/checkout@v4: This defines the first step of our job, named "Checkout code". It uses the "Checkout V4" Action, which: "checks-out your repository under $GITHUB_WORKSPACE, so your workflow can access it."
- name: Install packages, run: npm ci: This second step, named "Install packages" runs a special version of "npm install"; npm ci. The "ci" command is "similar to npm install, except it's meant to be used in automated environments such as test platforms, continuous integration, and deployment -- or any situation where you want to make sure you're doing a clean install of your dependencies."
- name: Run ESLint, run: npm run lint: This is the final "linting" step, as identified above. With the environment set up and the packages obtained, we should be able to successfully execute this command.
Running our First Workflow
Now that we have a complete workflow defined, ie:
File: .github/workflows/ci.yaml
name: CI
on: [push]
jobs:
  run-tests:
    name: Lint and Test
    runs-on: ubuntu-latest

    steps:
      - name: Checkout code
        uses: actions/checkout@v4

      - name: Install packages
        run: npm ci

      - name: Run ESlint
        run: npm run lint
Let's check in our code using "git" and once again "push" it to GitHub.
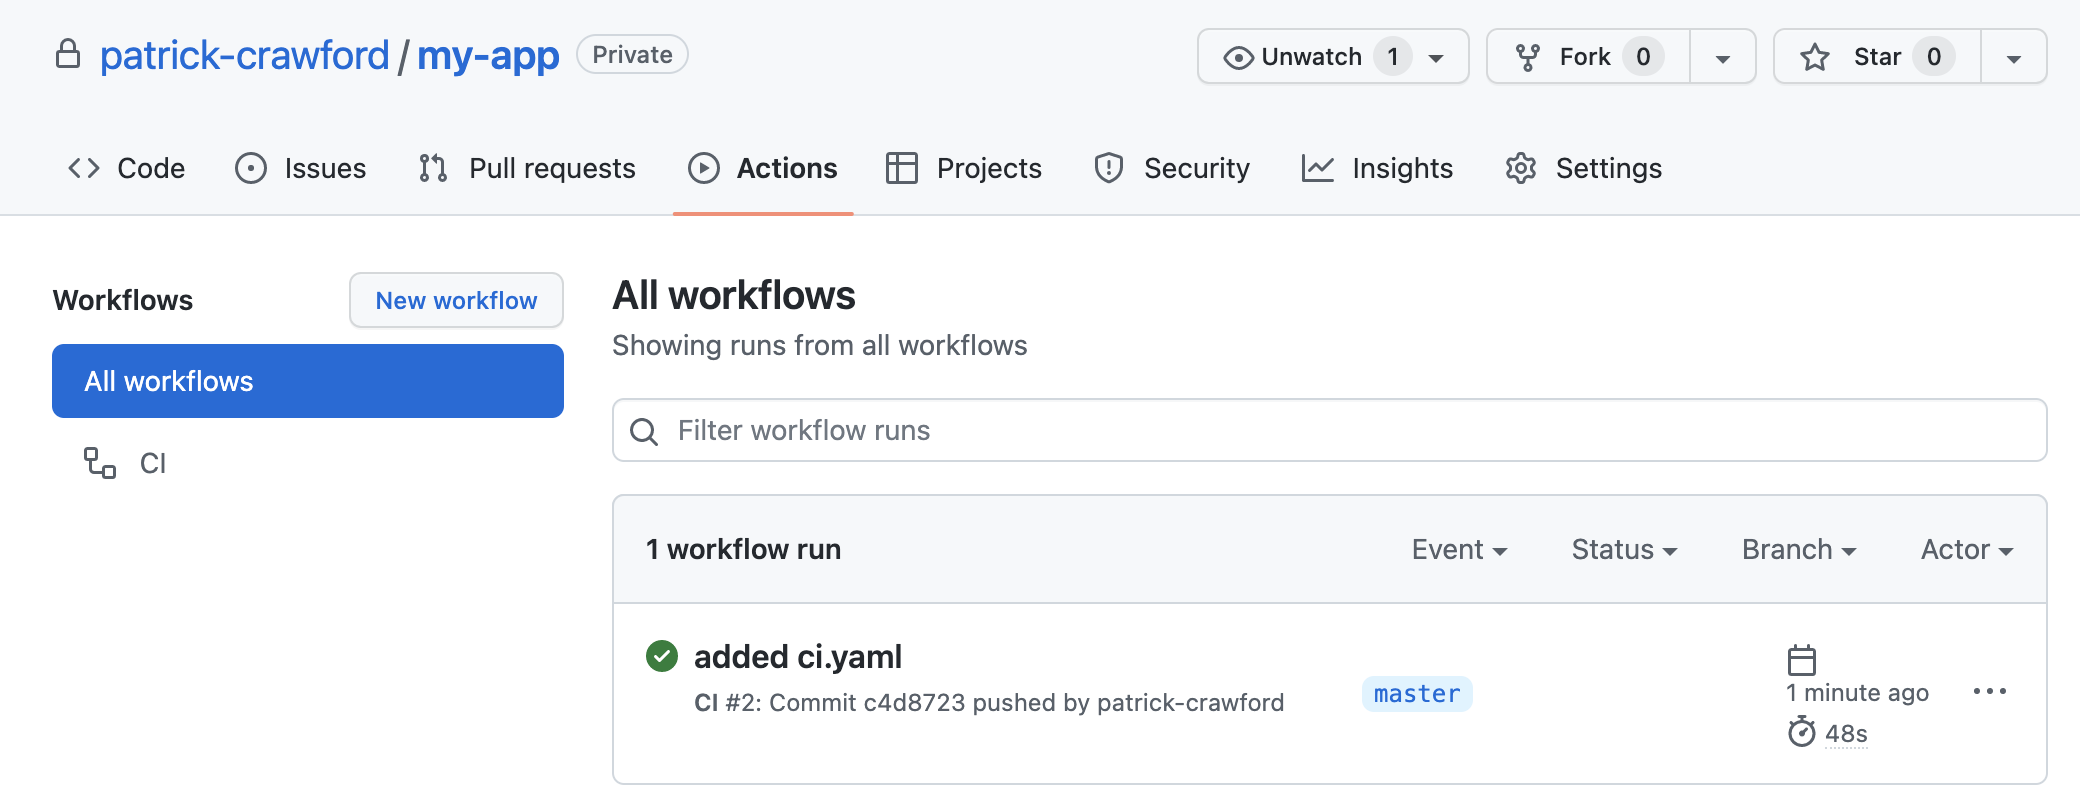
Once this has completed, view your repository on https://github.com and navigate to the "Actions" tab to see the workflow status. Each workflow run is named after the commit message, in this case "added ci.yaml".
NOTE: You may also click on the workflow run from this screen to see the detailed steps:
Next, let's see what happens if we introduce some code that causes ESLint to report an error:
File: "pages/_app.js"
import '@/styles/globals.css'

export default function App({ Component, pageProps }) {
  return <br /><Component {...pageProps} />
}
This should yield the following ESLint Error:
Error: Parsing error: Adjacent JSX elements must be wrapped in an enclosing tag. Did you want a JSX fragment <>...</>? (4:15)
With the broken code in place, push your updated code to GitHub and view the next workflow run in the "Actions" tab - it should appear directly above the previous workflow:
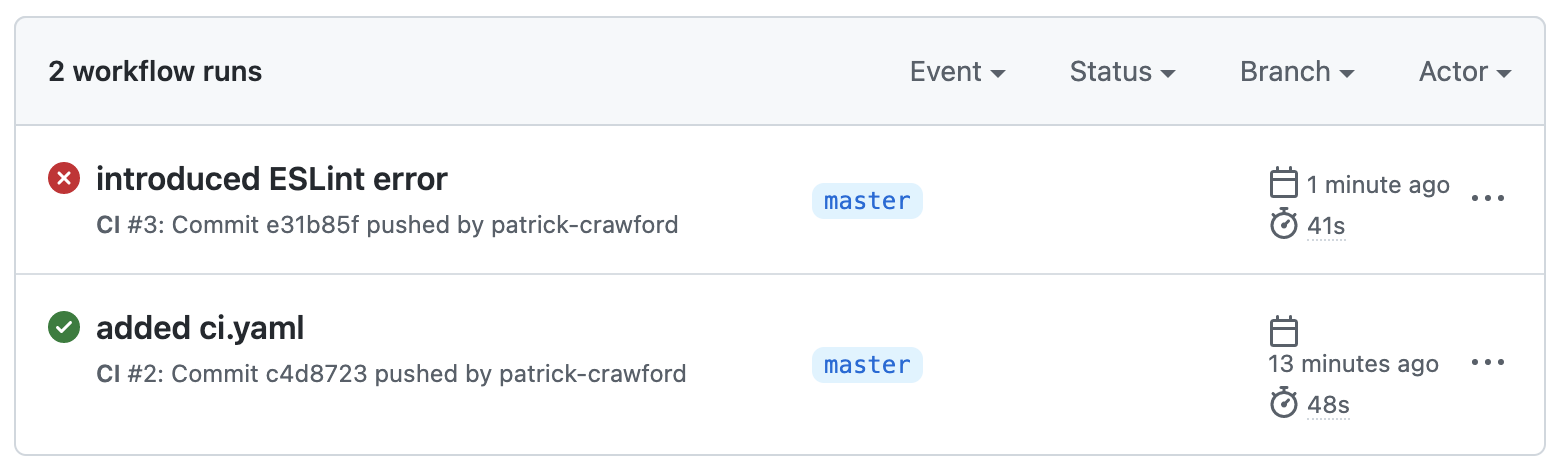
If you examine the detailed output, you should see error repeated as above.
Adding Unit / E2E Testing
You will notice that our sample project "app-with-tests" has been configured to test the "Home" component using both "Jest" and "Cypress" Tests:
File: "tests/index.test.js"
This is simply the first "Jest" test that was covered when "Unit Testing" was first discussed, ie: asserting that the Home component renders at least one link to https://vercel.com within the first child element of the "main" section.
File: "cypress/e2e/spec.cy.js"
describe('check Not Found (404)', () => {
  it('should return status 404 when visiting /unknown', () => {
    // See Request: https://docs.cypress.io/api/commands/request and
    // Its: https://docs.cypress.io/api/commands/its for more information regarding this test
    cy.request({ url: '/unknown', failOnStatusCode: false }).its('status').should('equal', 404);
  });
});
This Cypress test uses a "command" that we haven't seen before: "cy.request()". Essentially all that we are doing here is making a request to "/unknown", knowing that we do not have a route defined for that path. The expected behaviour is that the status code for the returned page is "404". The "its()" command is used to get a property value ("status") of the returned object.
If we wish to include the execution of these tests as a part of our workflow, we must add the following additional steps to our "Lint and Test" job, defined in .github/workflows/ci.yaml:
- name: Run Jest Tests
  run: npm run ci:test

- name: Run Cypress Tests
  uses: cypress-io/github-action@v6
  with:
    build: npm run build
    start: npm start
Here, the syntax for the "Jest" test is straightforward, as it is the same command that we would run in the integrated terminal in Visual Studio Code. However, setting up the "Cypress" E2E test is less straightforward, since the app must technically be running to perform the tests.
To get this working, we have used a github action created for Cypress. We use "with" to provide a map of input parameters to the action, ie the "build" and "start" commands.
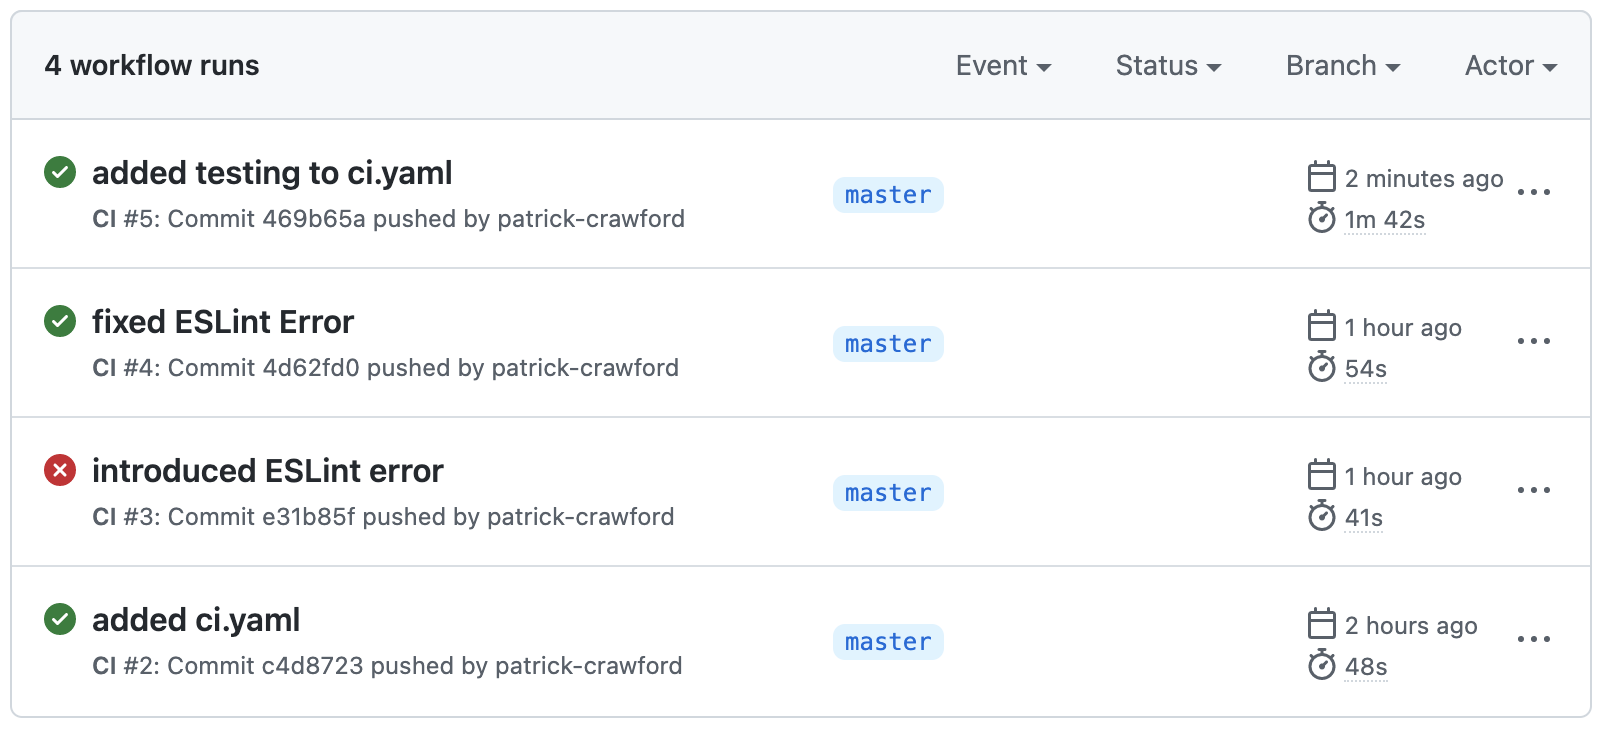
Once you have added the above code to your ".github/workflows/ci.yaml" file, check in the updated code and "push" it to GitHub to confirm that the updated workflow is indeed running the tests.
Merging Code from Other Branches
Since part of "Continuous Integration" is integrating code changes and merging them into a central repository, we must discuss what this looks like in GitHub and how our Action (workflow) can help ensure code correctness for our main / master branch.
First, let's work on a bug identified by the client; in this case, they have noted that there must be a ":" character after the text "By" before the "Vercel" logo. In addition to fixing this issue, let's break one of our tests to see how we may be alerted of the potential danger of merging this bug fix into the master branch:
To begin, issue the following command to checkout a new "branch" for the fix
git checkout -b fix/logo
You can verify that we have moved to the new branch by executing the command:
git branch
Now that we know we are working on the "fix/logo" branch and not the "master" branch, we can proceed to update the code next to the "Vercel" logo within the "Home" component:
File: "pages/index.js"
<div>
  <a
    href="https://abc.com?utm_source=create-next-app&utm_medium=default-template&utm_campaign=create-next-app"
    target="_blank"
    rel="noopener noreferrer"
  >
    By:{' '}
    <Image
      src="/vercel.svg"
      alt="Vercel Logo"
      className={styles.vercelLogo}
      width={100}
      height={24}
      priority
    />
  </a>
</div>
Notice how we have added the required ":" character in the appropriate place in the UI to fix the bug. However, we have also introduced a potential problem by changing the "vercel.com" link to "abc.com", thus breaking our "Jest" unit test and making this bug fix unfit for merging with the "master" branch.
To see how we can be alerted of this, go ahead and execute the following commands to commit the code and push it to GitHub:
git add .
git commit -m "Fix - added : after By before logo"
git push origin fix/logo
After you have pushed your branch to GitHub using the above code, open your browser to view your code on https://github.com and navigate to the "Pull Requests" tab:
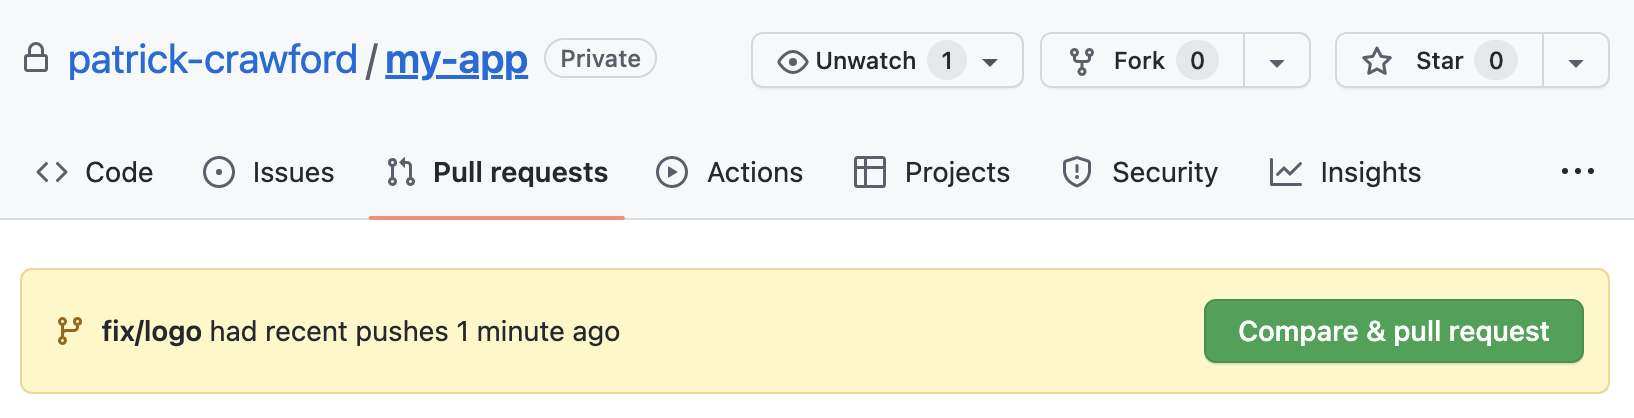
You will notice that GitHub has detected a recent push to the branch fix/logo and is suggesting that you make a "pull request"
NOTE: Pull requests let you tell others about changes you've pushed to a branch in a repository on GitHub. Once a pull request is opened, you can discuss and review the potential changes with collaborators and add follow-up commits before your changes are merged into the base branch. For more information, see the GitHub Documentation on Pull Requests
Click this button to open a "pull request". At the next page, use the default values and create the request by pressing the "Create pull request" button.
This should take you to detailed information for the pull request where you can see that there is an issue: "All checks have failed"
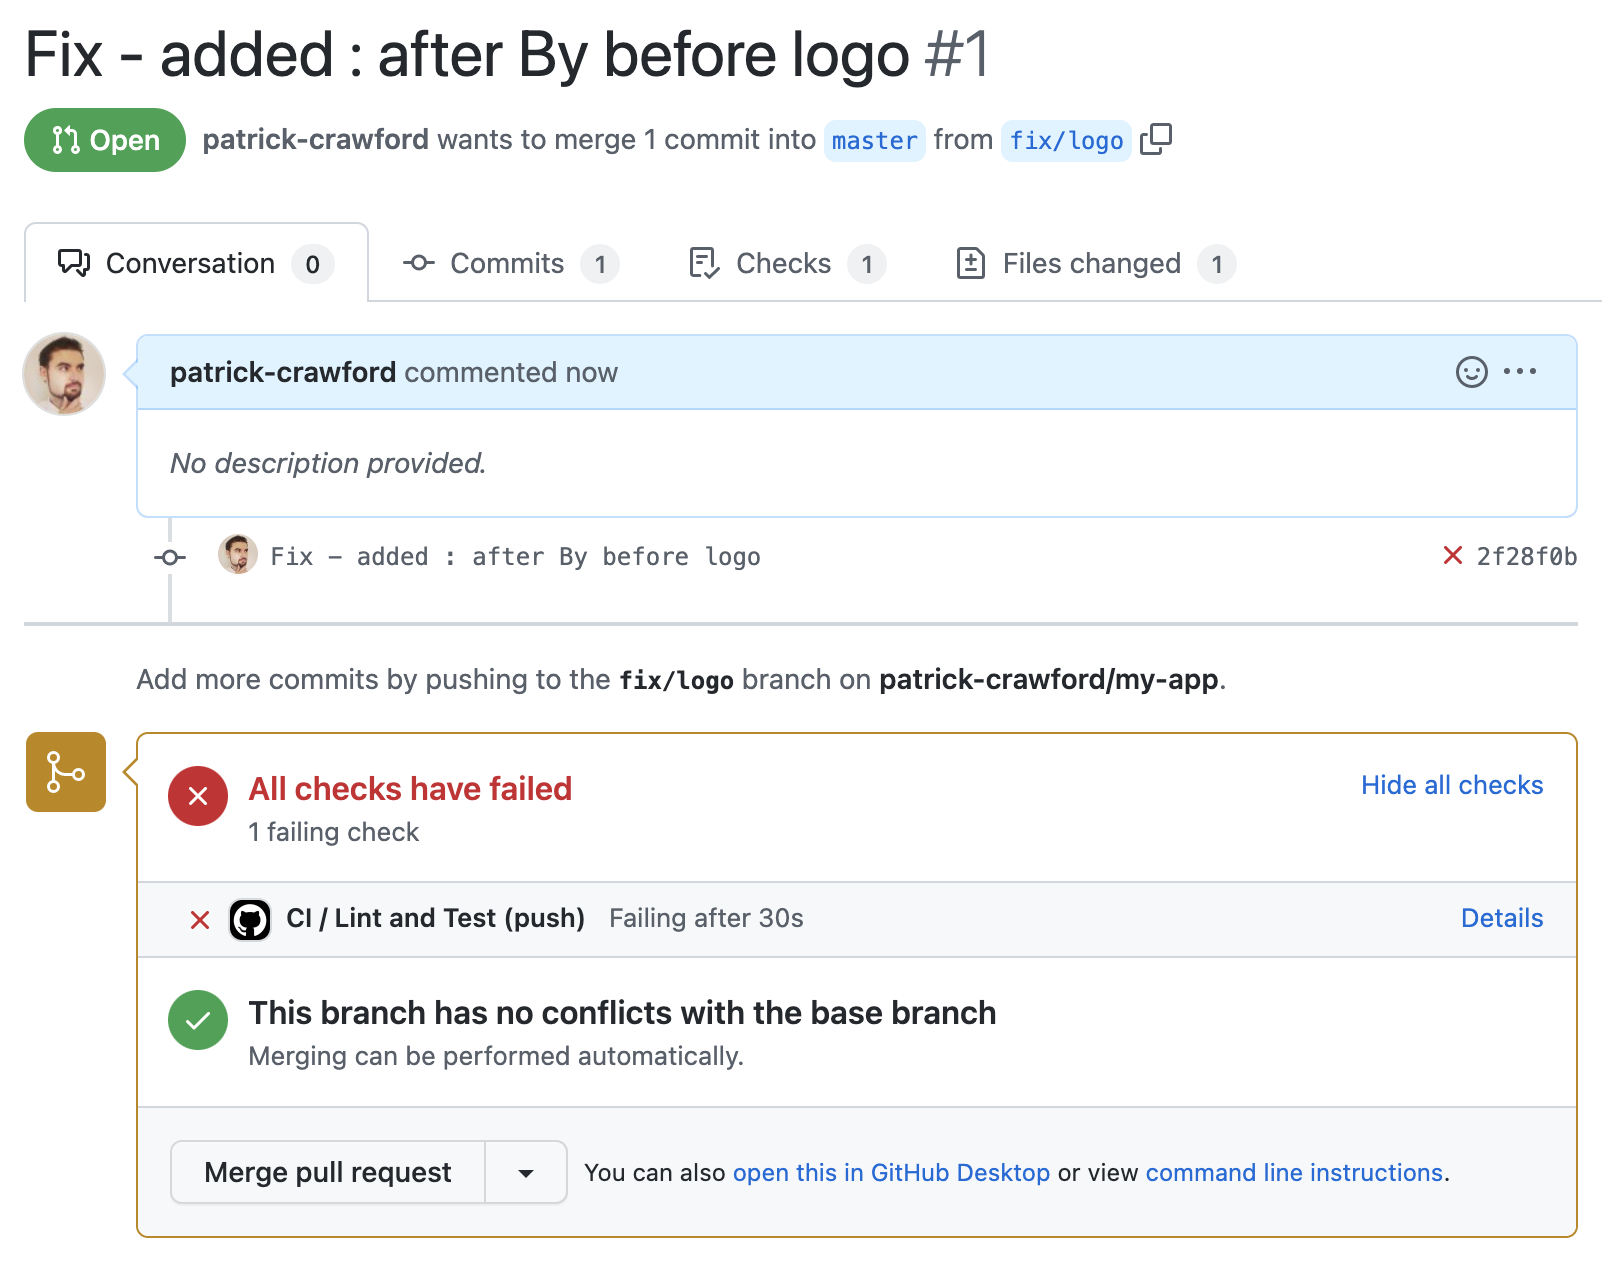
It is from this screen that you can comment on the pull request, requesting that the developer fix the breaking code, etc.
To fix this code and make it fit for merging, change "abc.com" back to "vercel.com" and check in the branch once again using the previous commands, ie:
git add .
git commit -m "Fix - restored vercel.com link"
git push origin fix/logo
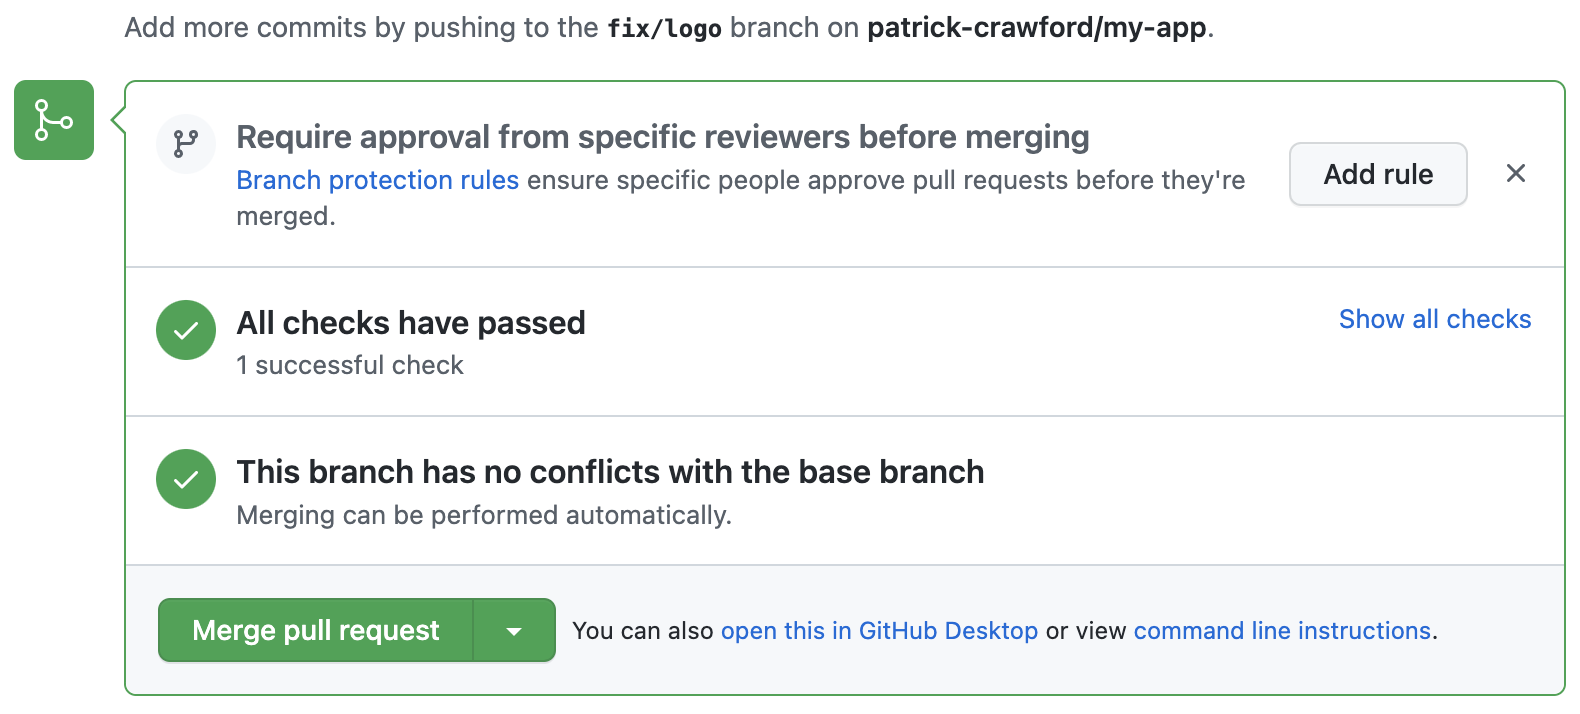
This will trigger the tests to once again run and update the pull request, indicating that "All Checks have passed" and the "Merge pull request" is now shown in green:
Go ahead and merge the request to update your "master" branch on GitHub with the bug fix. If you wish to update your local "master" branch with the fix, you can issue the commands:
git checkout master
git pull origin master