Continuous Deployment
The second piece of the "CI/CD" acronym may either stand for "Continuous Delivery" or "Continuous Deployment". From Atlassian:
Continuous Delivery:
Continuous delivery is an extension of continuous integration since it automatically deploys all code changes to a testing and/or production environment after the build stage.
This means that on top of automated testing, you have an automated release process and you can deploy your application any time by clicking a button.
In theory, with continuous delivery, you can decide to release daily, weekly, fortnightly, or whatever suits your business requirements. However, if you truly want to get the benefits of continuous delivery, you should deploy to production as early as possible to make sure that you release small batches that are easy to troubleshoot in case of a problem.
Continuous Deployment:
Continuous deployment goes one step further than continuous delivery. With this practice, every change that passes all stages of your production pipeline is released to your customers. There's no human intervention, and only a failed test will prevent a new change to be deployed to production.
Continuous deployment is an excellent way to accelerate the feedback loop with your customers and take pressure off the team as there isn't a "release day" anymore. Developers can focus on building software, and they see their work go live minutes after they've finished working on it.
For our purposes, we will be discussing and practicing "Continuous Deployment" using the same "app-with-tests" example code from the discussion on "Continuous Integration" (if you wish to begin with a completed version of that code, you may use the "app-with-CI" folder. However, you will need your code to be pushed to GitHub for the following instructions).
(Re)Introduction to Vercel
To add Continuous Deployment to our pipeline, we will leverage the excellent free services available from Vercel, the creators of Next.js.
To begin using Vercel, we must ensure that our code has been pushed to a public Git provider such as: GitHub, GitLab or BitBucket. If you have been following along with the Continuous Integration instructions, this should indeed be the case.
First, browse to https://vercel.com and hit the "Start Deploying" button.
Next, press the "Continue with GitHub" button, since our code is located on GitHub.
If you are not currently logged in to GitHub, you will need to provide your credentials in a pop-up window before continuing.
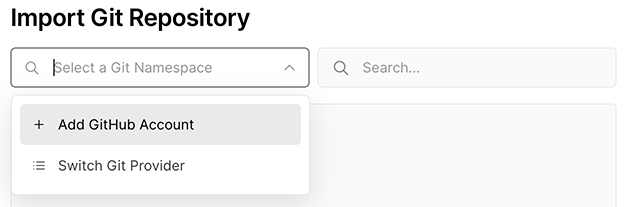
Once you have logged in to GitHub, you will be taken to the Let's build something new. screen in Vercel, which prompts you to "Import Git Repository". From here, you will need to click "+ Add GitHub Account"
- This will prompt you to "Install Vercel". From here, we would like to find our specific app, ie "my-app" on GitHub. You will need to start by clicking your account and choosing the "Only select repositories" and finding the "my-app" repository.
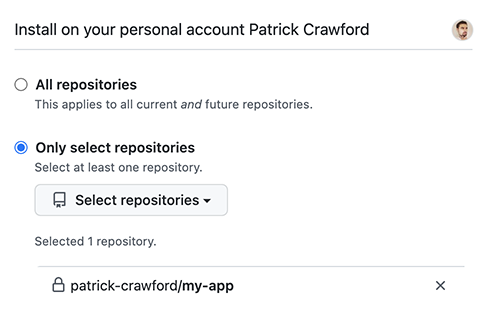
Once you have selected the target repository (ie: "my-app"), click the green Install button
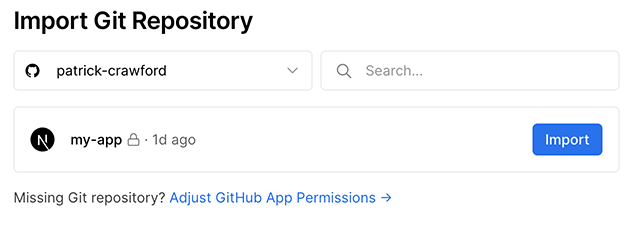
You should now see the my-app repository available for import. To proceed, click Import
At the next page, you are not required to make any changes, as Vercel should detect that we are using Next.js in the "framework preset". If you had any environment variables, you could set them here. However, since we aren't currently using any environment variables, click Deploy.
Once the deploy step has completed, you should be taken to a "Congratulations!" page with a black button labeled Go To Dashboard. Click this to see the information about your deployment.
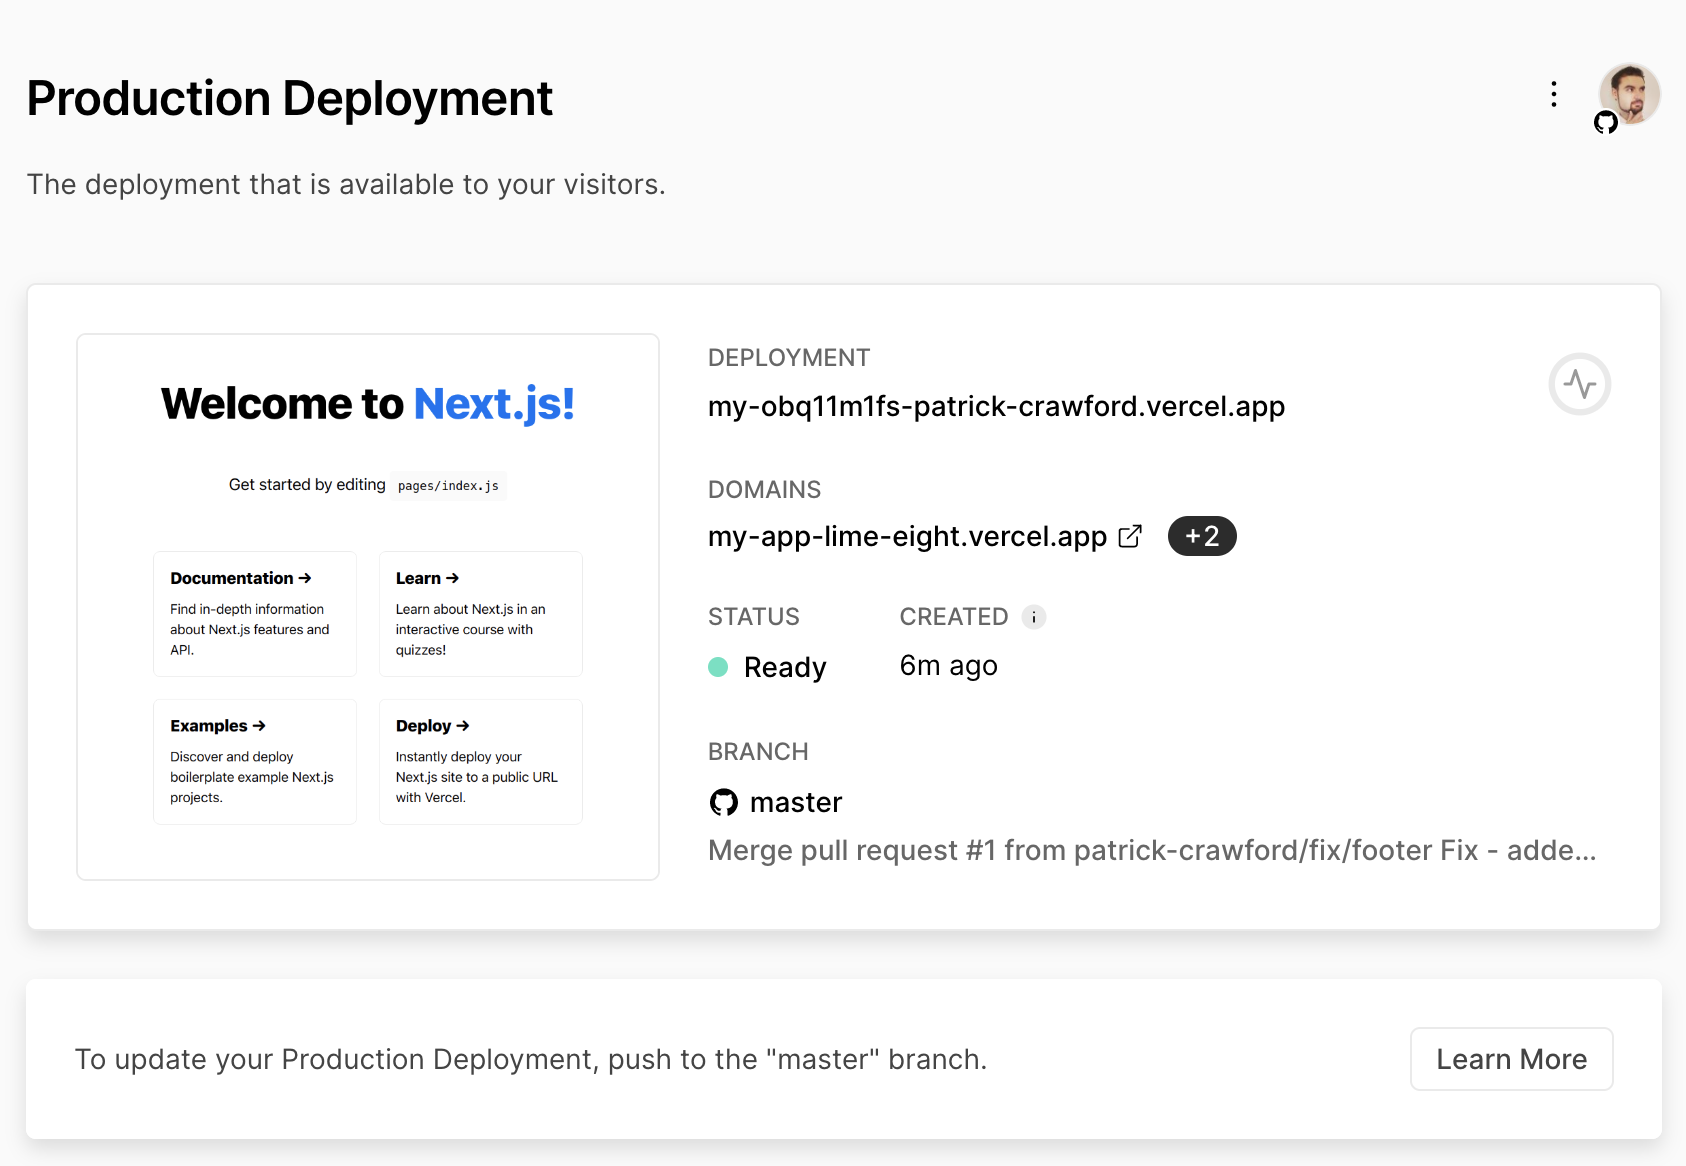
- From the dashboard, we are presented with some important information, primarily the "Domains" section, which shows the production URL of the app (in this case: my-app-lime-eight.vercel.app)
Updating the Production Site
Now that we have a working site deployed on Vercel (ie: in "Production"), let's take a step back and see how we can use this pipeline to make an update:
For example, say we wish to append the text "(Starter Site)" to the <title>...<title> element of the "Home" page:
- Create (and switch to) a new branch for this update.
git checkout -b fix/home-title
Update the code and save your changes, ie:
File: "pages/index.js"
<title>Create Next App (Starter Site)</title>
- Commit your local changes:
git add .
git commit -m "appended text to title on Home"
- Push the "fix/home-title" branch to GitHub
git push origin fix/home-title
Preview Deployments
If you navigate back to the dashboard for the Vercel app, you will see that we now have a "Preview Deployment", generated from our push to the "fix/home-title" branch:

Effectively, this means that we have not altered our production site (my-app-lime-eight.vercel.app), but instead created a "Preview" of what the production site would look like with the change. In this case, this preview has been assigned the url "my-jk1f8wunw-patrick-crawford.vercel.app".
As before, since we pushed a separate branch to our repository, GitHub gives an option to create a Pull Request. Once we do, we can confirm that Vercel has created the preview deployment and all of our tests passed:

If the "Preview" is approved, then we can proceed to merge the pull request. This will trigger a rebuild with Vercel and our production site will be updated to match the Preview.
As before, if you wish to update your local "master" branch with the fix, you can issue the commands:
git checkout master
git pull origin master