JSON Web Tokens (JWT)
With our new authentication routes tested and working correctly, we can now concentrate on leveraging this logic to actually secure the vehicle data in our simple API.
Currently, the /api/vehicles route is available to anyone, regardless of whether they've been authenticated or not. You can see this by:
- Executing a POST request to "/api/login" with an incorrect password for "bob"
- Following the POST request, make a GET request to "/api/vehicles".
- Observe that the "/api/vehicles" endpoint displays the vehicle data.
The fact that we did not provide correct credentials during the "login" phase, had no effect on whether or not we can access the data on the "/api/vehicles" route.
So, how can we solve this problem? Essentially, what we need is some kind of secure, tamper-proof "logged in" identifier that we can send back to the client once they have been authenticated ("logged in"). This identifier could be stored on the client and sent with subsequent requests, serving as both identification and proof that they have been authenticated by the server.
JSON Web Token (JWT) to the rescue
JSON Web Token (JWT) is an open standard (RFC 7519) that defines a compact and self-contained way for securely transmitting information between parties as a JSON object. This information can be verified and trusted because it is digitally signed. JWTs can be signed using a secret (with the HMAC algorithm) or a public/private key pair using RSA or ECDSA.
This is perfect for our purposes. We can generate a JWT on the server (only) once the user has been successfully authenticated and send it back to the client along with the "login successful" message. It will contain digitally-signed information about the authenticated user such as their "userName", "fullName" & "role" (but never their password). The client can then read this information and send the JWT back to the server in an "Authorization" header with every subsequent request to be verified on the server. Since it is digitally signed on the server using a "secret", we can verify that the data has not been tampered with and that the JWT did indeed come from our simple API server and we can send the requested data.
When should you use JSON Web Tokens? Here are some scenarios where JSON Web Tokens are useful:
Authorization: This is the most common scenario for using JWT. Once the user is logged in, each subsequent request will include the JWT, allowing the user to access routes, services, and resources that are permitted with that token. Single Sign On is a feature that widely uses JWT nowadays, because of its small overhead and its ability to be easily used across different domains.
Information Exchange: JSON Web Tokens are a good way of securely transmitting information between parties. Because JWTs can be signed—for example, using public/private key pairs—you can be sure the senders are who they say they are. Additionally, as the signature is calculated using the header and the payload, you can also verify that the content hasn't been tampered with.
For more information about JWT, including the signature & structure of the payload, see the excellent documentation at https://jwt.io/introduction/
Securing routes with JWT
We have now identified that we would like to work with JWT to secure our routes. However, how do we go about implementing JWT generation and verification in our server.js? This will involve 3 key modules, obtained from NPM:
jsonwebtoken
The "jsonwebtoken" module (available using npm install jsonwebtoken --save & added to server.js using: const jwt = require('jsonwebtoken');). In our application, this module is used primarily to "sign" our JSON payload with a 'secret' and generate the token, ie:
let token = jwt.sign({ userName: 'bob' }, 'secret');
We can also use a 3rd parameter to specify options such as expiresIn (A numeric value is interpreted as a seconds count):
jwt.sign({
  userName: 'bob'
}, 'secret', { expiresIn: 60 * 60 });
For more information on the usage of this function including additional options, methods and errors/codes see the documentaiton for jsonwebtoken on npm
passport
The "passport" module (available using npm install passport --save & added to server.js using const passport = require("passport");) is described as the following:
Passport is Express-compatible authentication middleware for Node.js. Passport's sole purpose is to authenticate requests, which it does through an extensible set of plugins known as strategies. Passport does not mount routes or assume any particular database schema, which maximizes flexibility and allows application-level decisions to be made by the developer. The API is simple: you provide Passport a request to authenticate, and Passport provides hooks for controlling what occurs when authentication succeeds or fails.
In our application, we will be using the following methods:
"initialize": This method is invoked when we add the passport middleware using the familiar app.use() method, ie:
app.use(passport.initialize());"authenticate": The "authenticate" method is used as a middleware function that can be used for each of our routes that we wish to secure. For example:
app.get("/api/vehicles", passport.authenticate('jwt', { session: false }), (req, res) => {
    // ...
}"use": The "use" method is where we specify our "strategy" for authenticating our routes. This is done near the top of server.js after the "strategy" is configured, ie:
passport.use(strategy);NOTE: Passport currently supports over 480 different authentication strategies including Facebook, Google and many others
passport-jwt
Since we will be using JWT, our strategy will be "passport-jwt" (available using npm install passport-jwt --save & added to server.js using const passportJWT = require("passport-jwt");). Using "passportJWT", we can specify the "strategy" using a set of options (defined in our server as an object called jwtOptions: let jwtOptions = {};), such as the "secretOrKey", as well as specifying how to read the jwt from the authentication header.
For example, once we have a reference to the "passport-jwt" module (ie: "passwordJWT", from above), we can use the following code to configure our strategy:
// JSON Web Token Setup
let ExtractJwt = passportJWT.ExtractJwt;
let JwtStrategy = passportJWT.Strategy;

// Configure its options
let jwtOptions = {
  jwtFromRequest: ExtractJwt.fromAuthHeaderWithScheme('jwt'),
  secretOrKey: '&0y7$noP#5rt99&GB%Pz7j2b1vkzaB0RKs%^N^0zOP89NT04mPuaM!&G8cbNZOtH',
};

// IMPORTANT - this secret should be a long, unguessable string
// (ideally stored in a "protected storage" area on the web server).
// We suggest that you generate a random 50-character string
// using the following online tool:
// https://lastpass.com/generatepassword.php

let strategy = new JwtStrategy(jwtOptions, function (jwt_payload, next) {
  console.log('payload received', jwt_payload);

  if (jwt_payload) {
    // The following will ensure that all routes using
    // passport.authenticate have a req.user._id, req.user.userName, req.user.fullName & req.user.role values
    // that matches the request payload data
    next(null, {
      _id: jwt_payload._id,
      userName: jwt_payload.userName,
      fullName: jwt_payload.fullName,
      role: jwt_payload.role,
    });
  } else {
    next(null, false);
  }
});
There's a lot going on in the above code, but the key pieces involve first defining the jwtOptions (using the jwtFromRequest and secretOrKey properties) and then defining the "strategy" as a (JwtStrategy) middleware function using the jwtOptions and providing a callback function. The callback function simply checks that there is indeed a valid jwt_payload and if so, invoke the next() method with the payload data as it's second parameter. If the jwt_payload is invalid, the next() method will be called without the payload data, which will cause our server to return a 401 (Unauthorized) error.
Adding the code to server.js
With all of the individual pieces of our JWT solution identified, it's now time to update server.js:
Step 1: Installation
As you will recall (from above), our JWT enabled server.js will require 3 modules: "jwt", "passport" & "passport-jwt" to function correctly. Using npm, install them into the project:
npm install jsonwebtoken --save
npm install passport --save
npm install passport-jwt --save
Step 2: Requiring the Modules
After installation, add the modules to our list of imports at the top of server js:
const jwt = require('jsonwebtoken');
const passport = require('passport');
const passportJWT = require('passport-jwt');
Step 3: Configuring the "Strategy"
With our modules added, we can now add the code to configure the JWT "strategy". Recall, this involves creating a jwtOptions object that we can pass to the jwtStrategy constructor, along with a callback function that looks at the "jwt_payload" parameter. For our purposes, we can use the code exactly as it has been identified above, placed before our first "app.use()" statement. However, a new "secretOrKey" property should be generated (optionally using the "Generate Password" Tool from LastPass).
NOTE: If the "user" has different properties (ie, something other than, "_id", "userName", "fullName" and "role"), the data passed in the next() function should be modified to reflect the correct properties.
How to add the strategy:
In server.js, add this code before the first usage of app.use():
// JSON Web Token Setup
let ExtractJwt = passportJWT.ExtractJwt;
let JwtStrategy = passportJWT.Strategy;

// Configure its options
let jwtOptions = {
  jwtFromRequest: ExtractJwt.fromAuthHeaderWithScheme('jwt'),
  secretOrKey: '&0y7$noP#5rt99&GB%Pz7j2b1vkzaB0RKs%^N^0zOP89NT04mPuaM!&G8cbNZOtH',
};

// IMPORTANT - this secret should be a long, unguessable string
// (ideally stored in a "protected storage" area on the web server).
// We suggest that you generate a random 50-character string
// using the following online tool:
// https://lastpass.com/generatepassword.php

let strategy = new JwtStrategy(jwtOptions, function (jwt_payload, next) {
  console.log('payload received', jwt_payload);

  if (jwt_payload) {
    // The following will ensure that all routes using
    // passport.authenticate have a req.user._id, req.user.userName, req.user.fullName & req.user.role values
    // that matches the request payload data
    next(null, {
      _id: jwt_payload._id,
      userName: jwt_payload.userName,
      fullName: jwt_payload.fullName,
      role: jwt_payload.role,
    });
  } else {
    next(null, false);
  }
});
Step 4: Set the Strategy & Add the Middleware
The last step needed to tell our server that we wish to use Passport (with the "JWT" strategy), by adding the function as middleware to our server using app.use():
// tell passport to use our "strategy"
passport.use(strategy);

// add passport as application-level middleware
app.use(passport.initialize());
Step 5: Generating & Sending the JWT
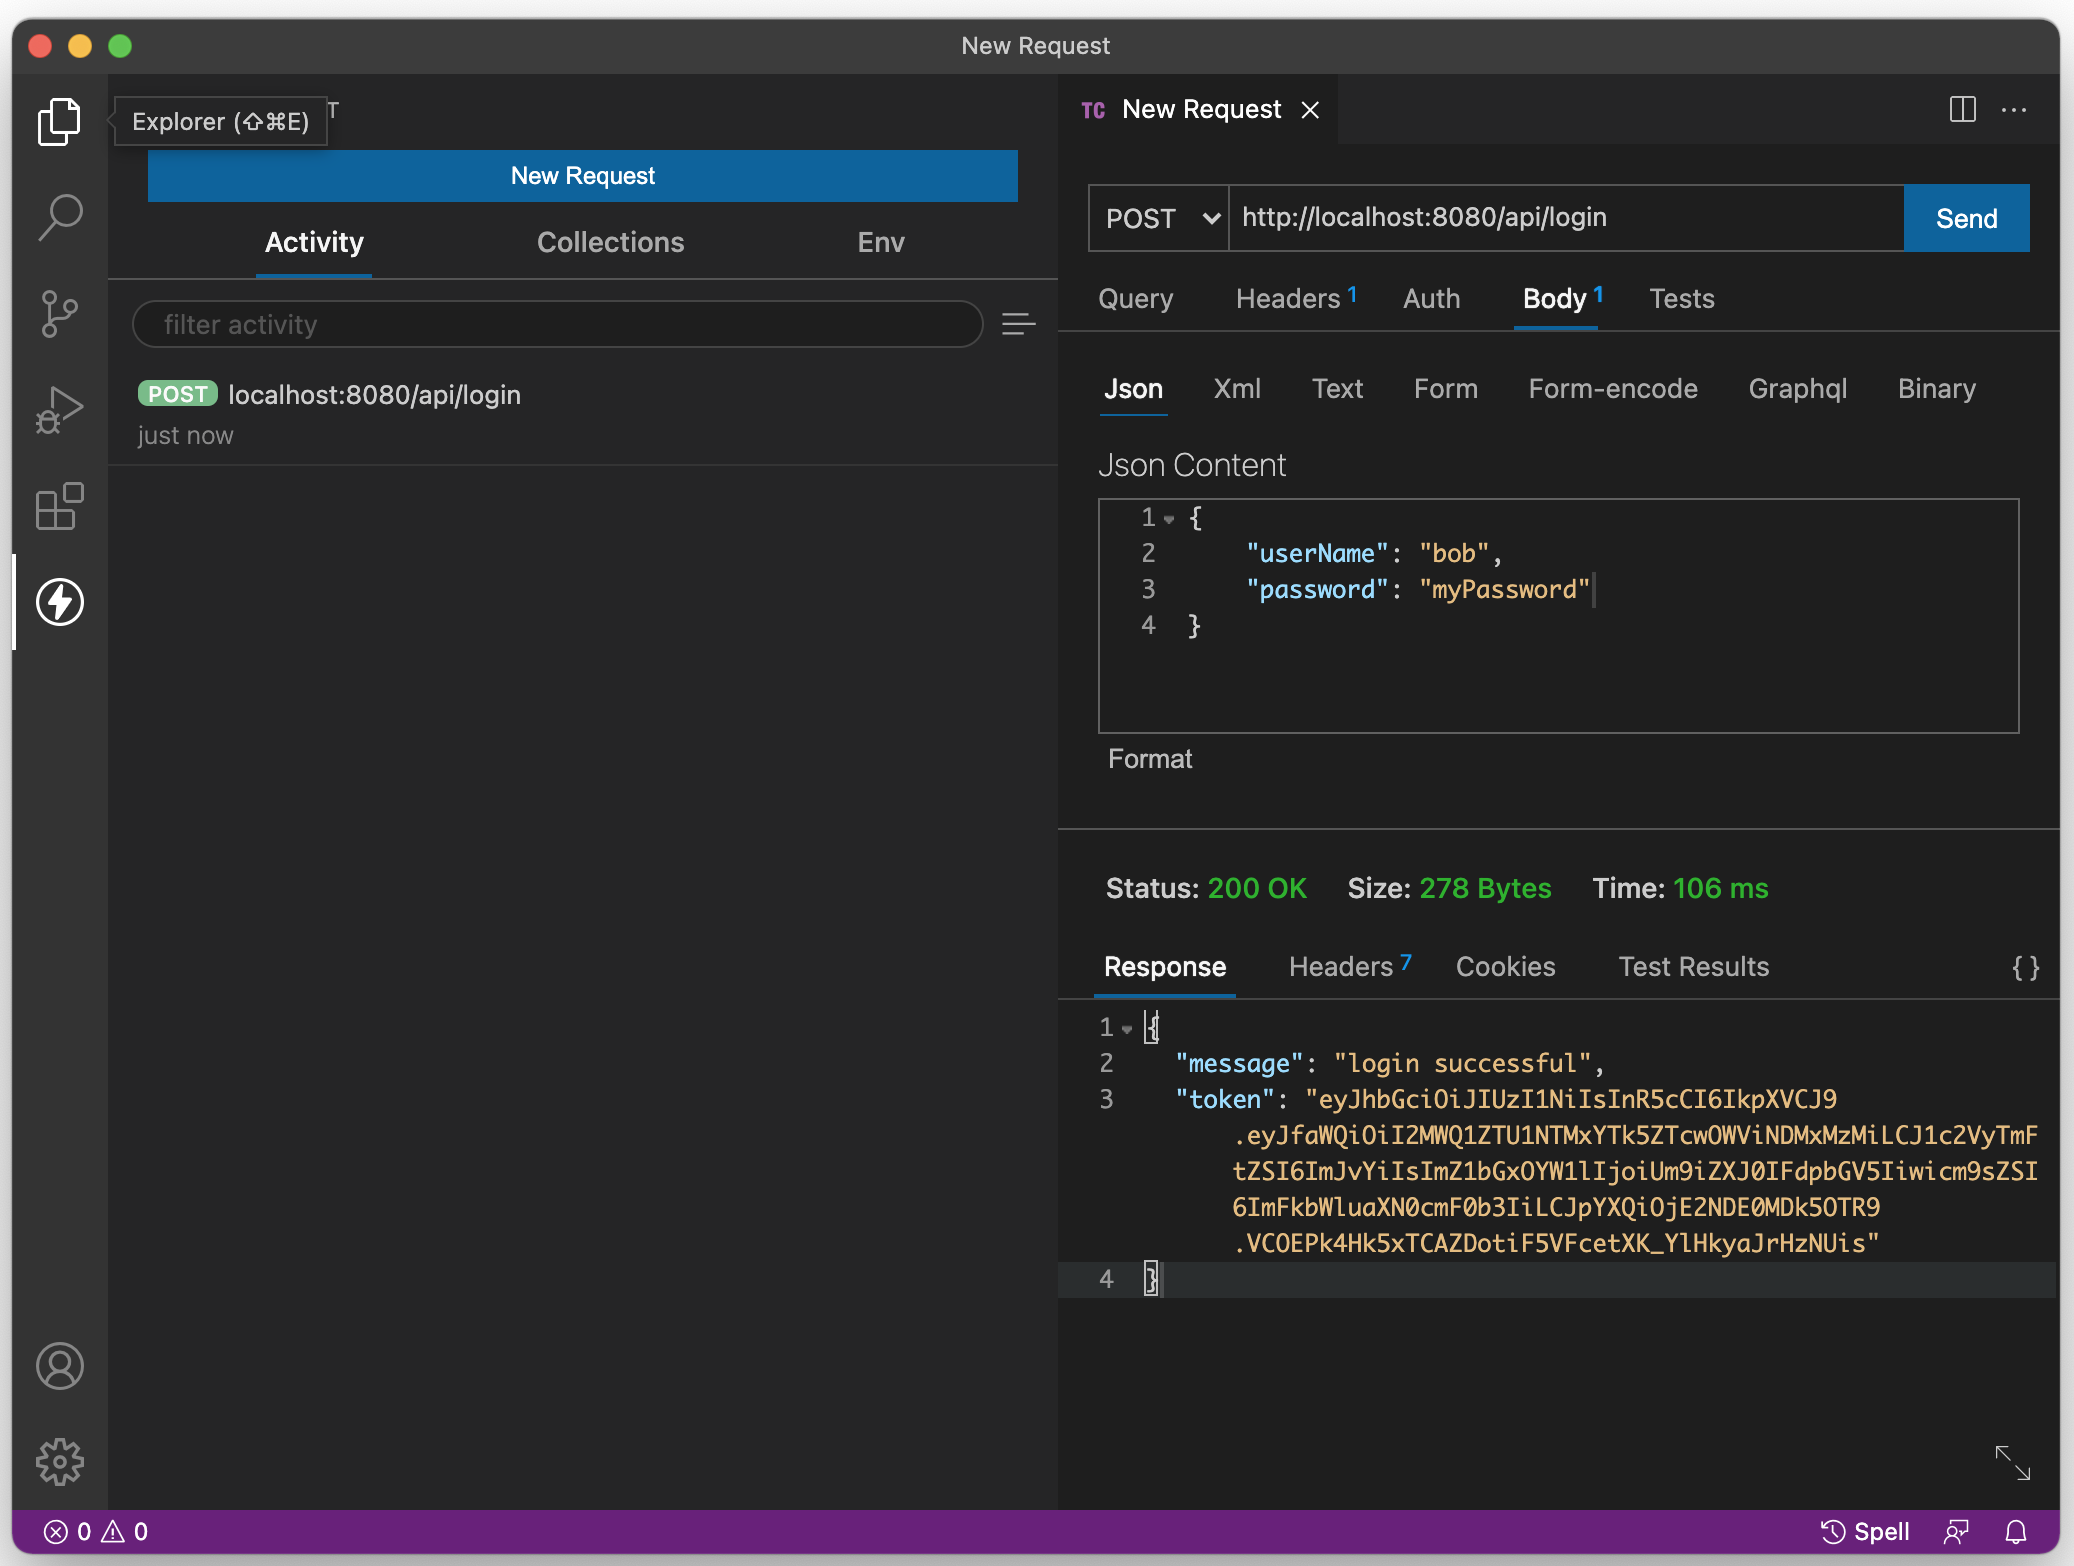
At this point, we're all set to work with JWT. We have the correct modules added and the Passsport middleware is configured and added to our application. However, before we can protect our routes (see below), we need to first send the token back to the client. Currently, our api/login route simply sends the following data with a 200 status code to indicate that the login was indeed successful:
{ "message": "login successful" }
If we wish to grant this user access to our (soon to be) protected routes, we must also provide the JWT as a means of identification. Using the sign() method of the included jsonwebtoken module, we can generate it and send it back to the client alongside the "message".
To accomplish this, we need to add the following code to our "/api/login" route at the top of our userService.checkUser(req.body).then( ... ) callback:
let payload = {
  _id: user._id,
  userName: user.userName,
  fullName: user.fullName,
  role: user.role,
};

let token = jwt.sign(payload, jwtOptions.secretOrKey);
This will generate a JWT for us using the user's "_id", "userName", "fullName" and "role" properties, encrypted with our "secretOrKey" (identified when we configured our passport strategy in jwtOptions).
Once we have the token, we can send it back along with the message to the user using res.json() (typically using the property: "token"):
res.json({ message: 'login successful', token: token });
Step 6: Protecting Route(s) using the Passport Middleware
In order to restrict access to our /api/vehicles route, we need to employ the Passport middleware "authenticate" function (identified above in our authenticate() example).
This simply involves adding the code:
passport.authenticate('jwt', { session: false })
as a middleware function to any routes that we wish to protecet (ie: our /api/vehicles route):
app.get("/api/vehicles", passport.authenticate('jwt', { session: false }), (req, res) => {
    // ...
}
You will notice that we provide the option "session: false". This is because we require credentials to be supplied with each request, rather than set up a session. For more information and configuration options, see the Passport.js documentation, under "Authenticate".
Testing the New Functionality
We have now completed all of the changes that are required on our server.js and are ready to test our Simple API and see if this technology really works to protect our routes.
To test this, we must insure the following series of actions yields the expected results (listed below):
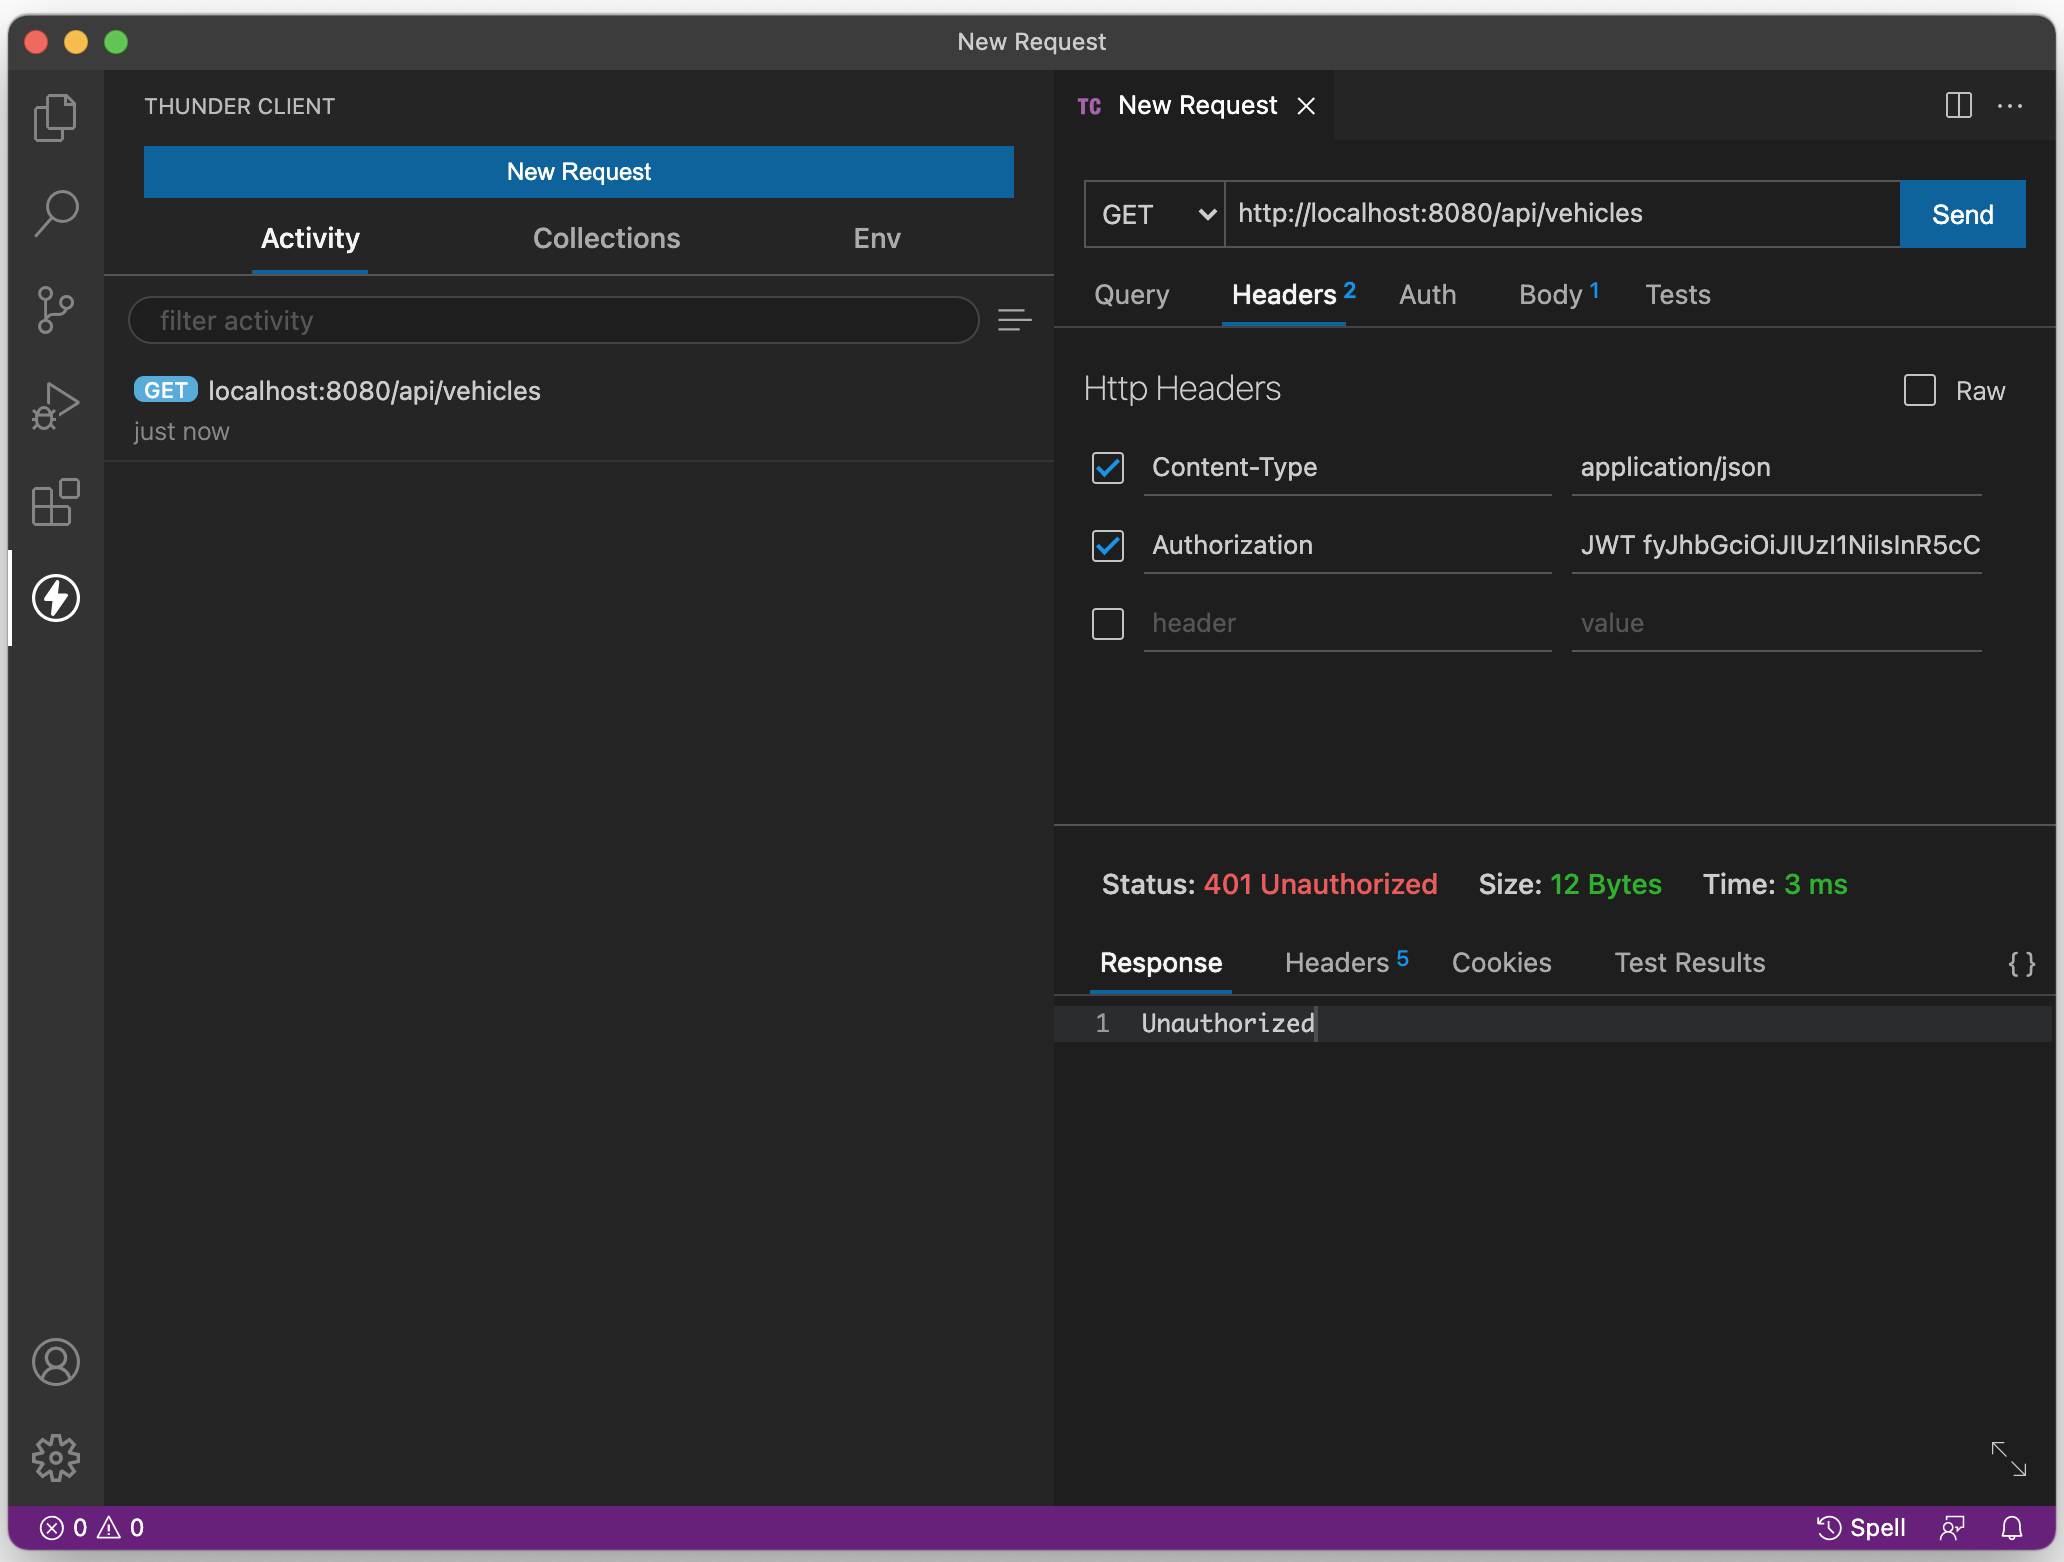
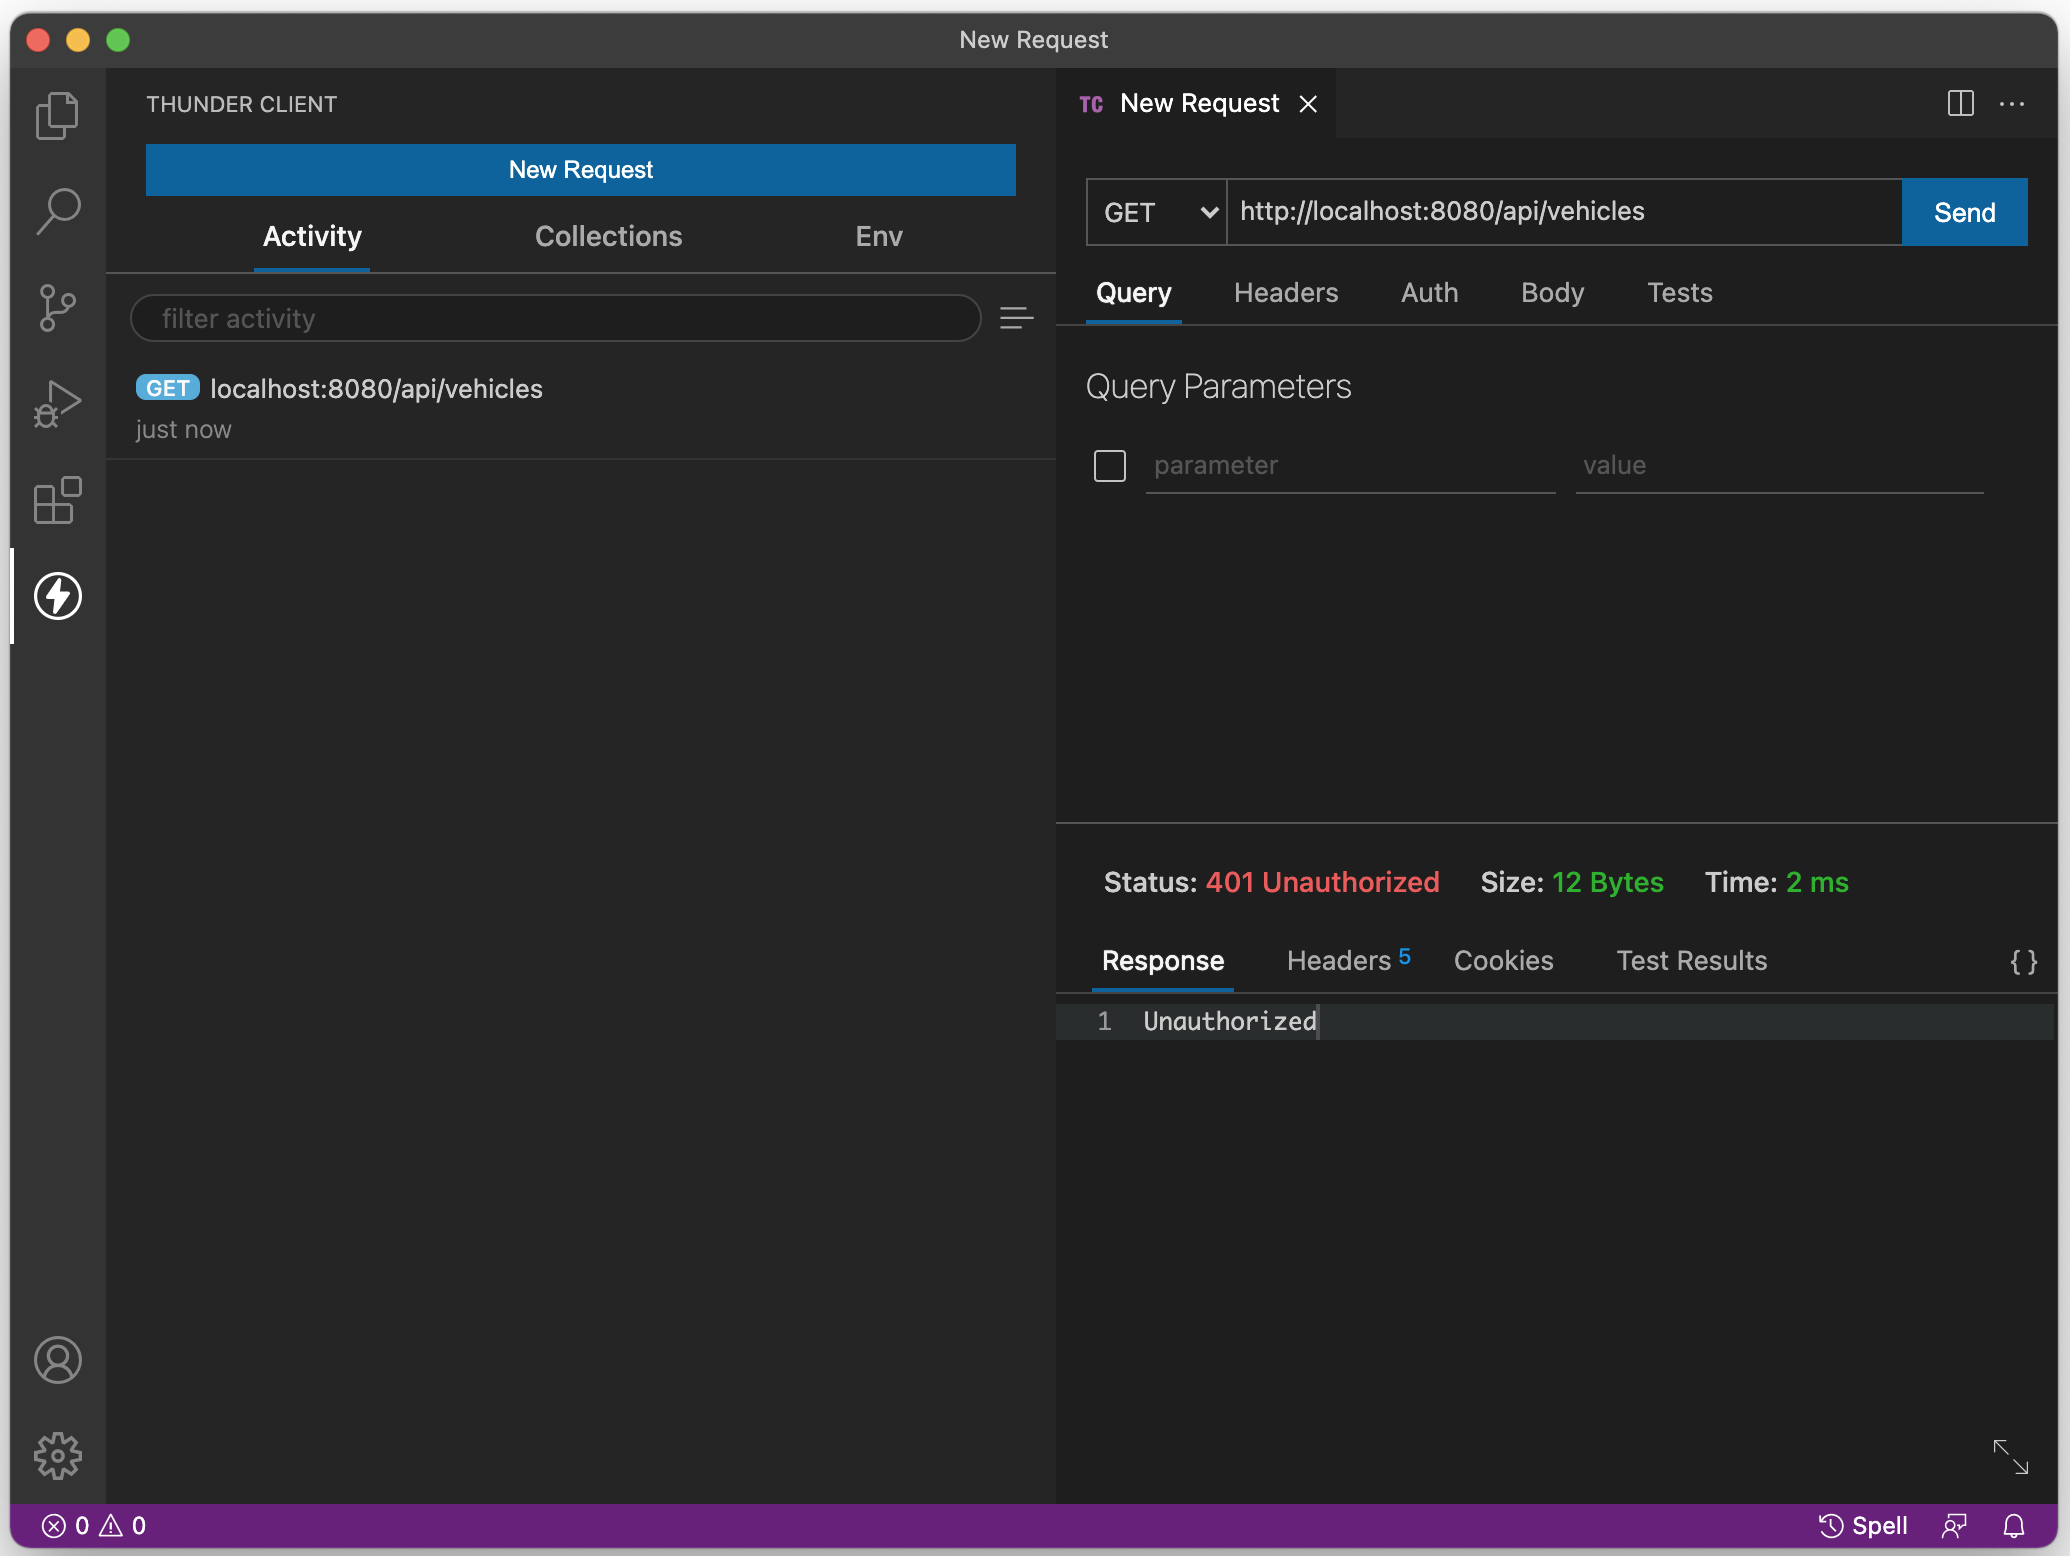
Action: Attempt to access the route /api/vehicles as before (without supplying a JWT).
Expected Result: Server returns a 401 error code and the text "unauthorized".
Action: Log in as user "bob" (as above) and copy the value of the returned "token" property.
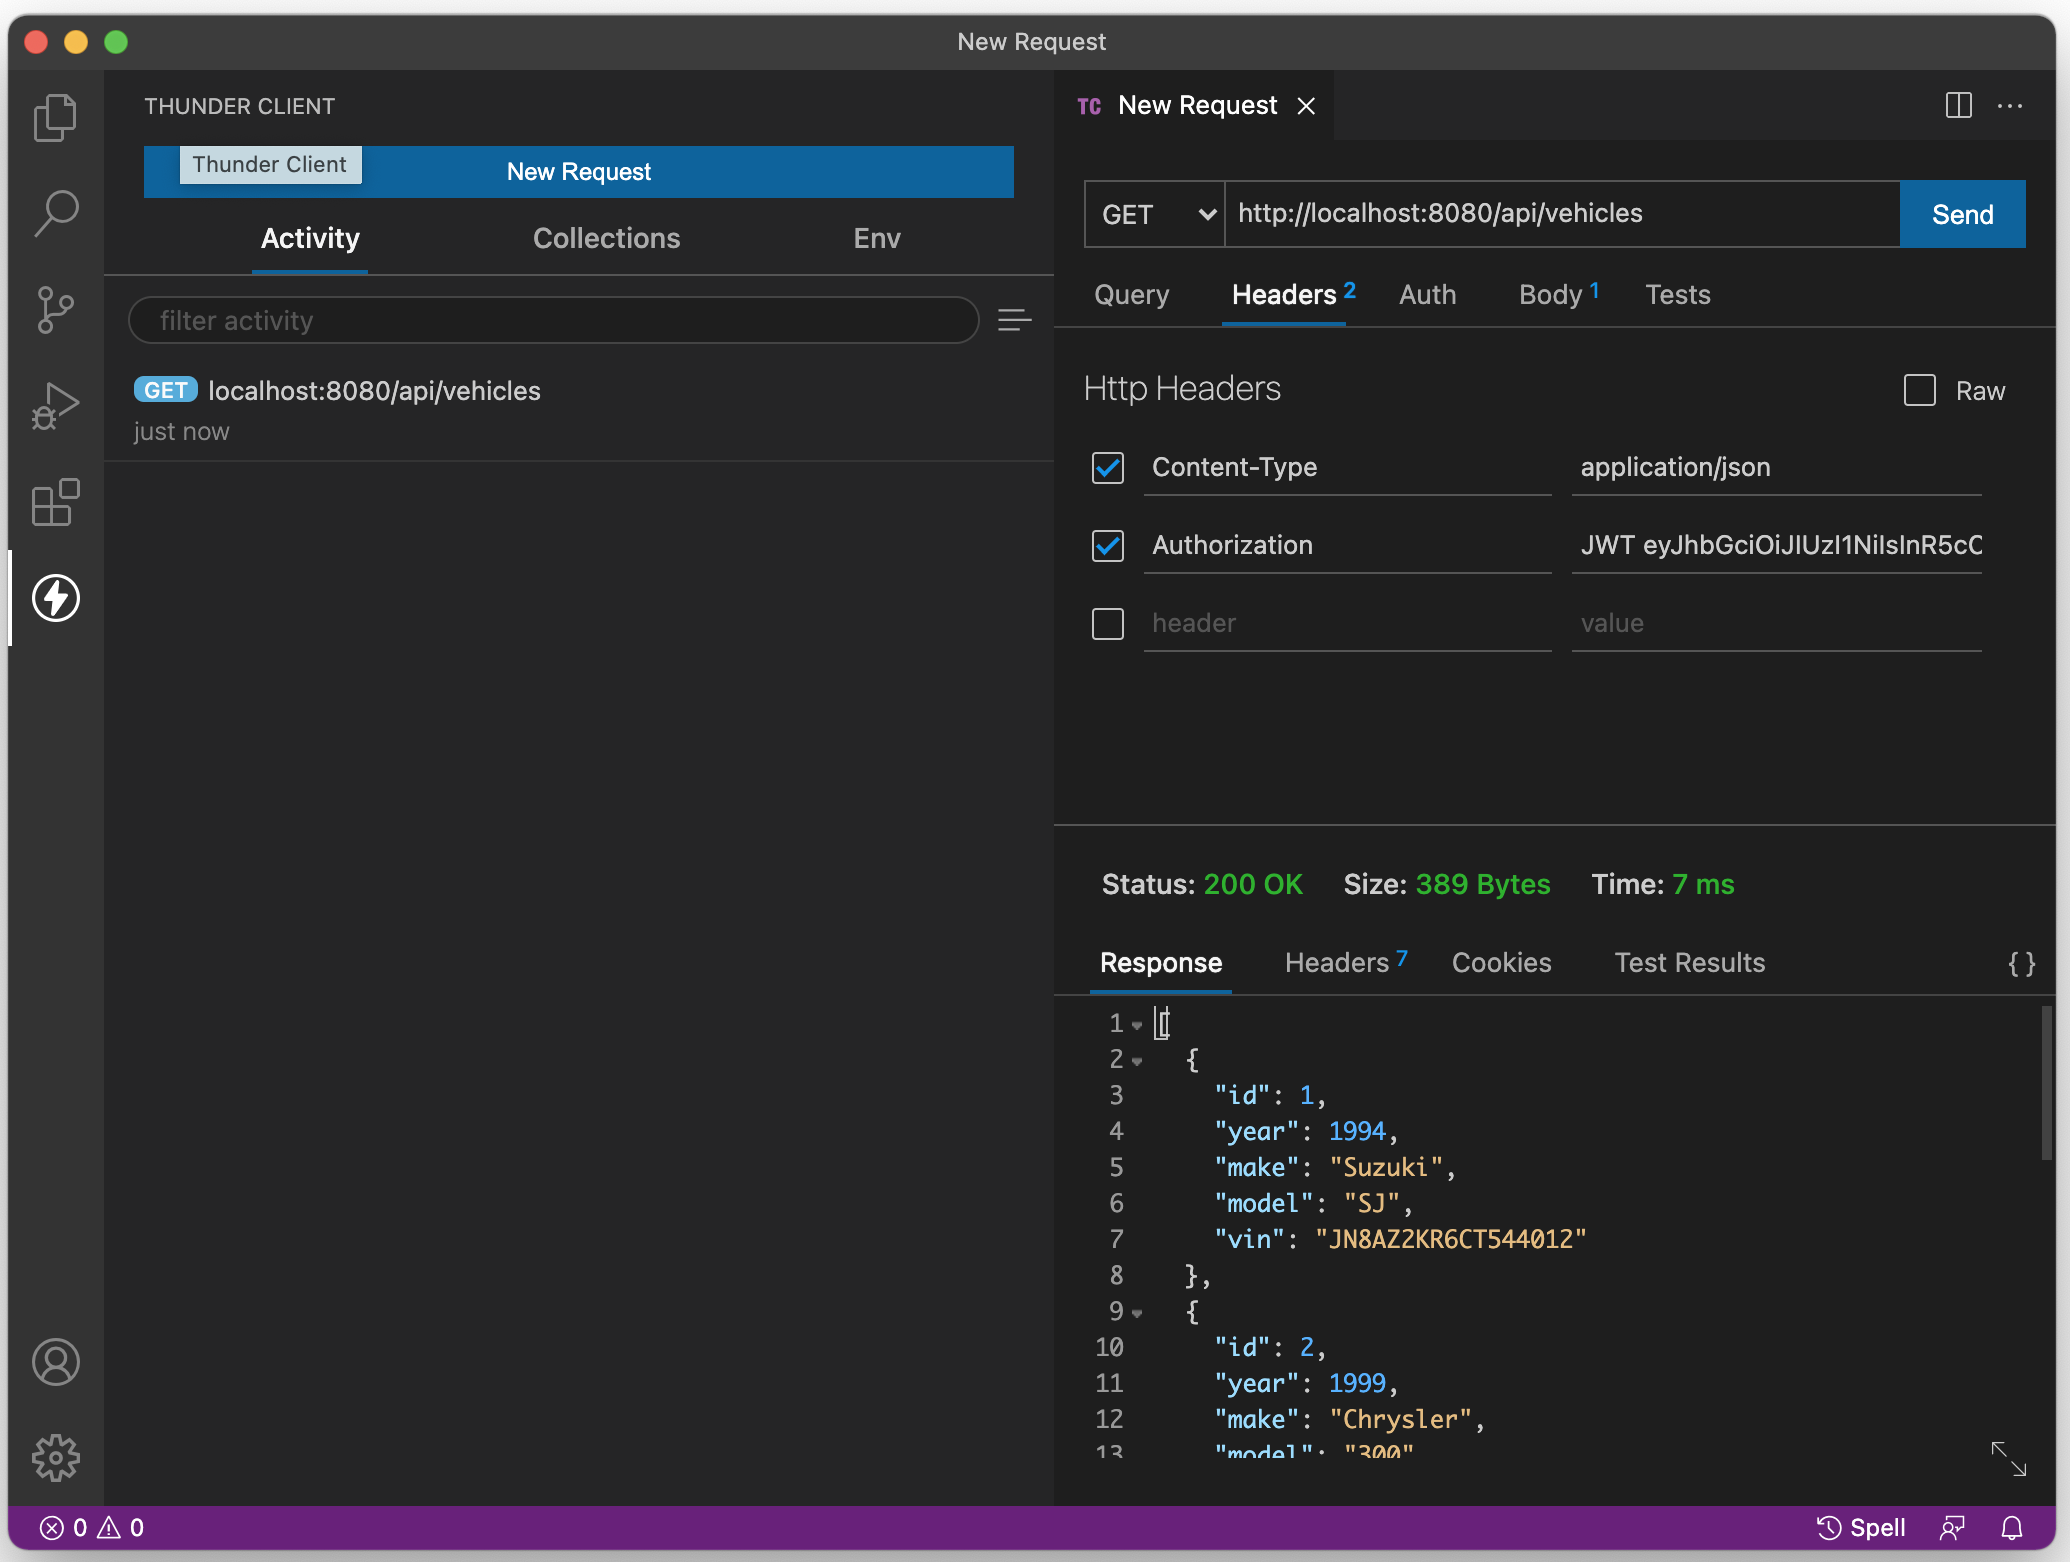
Action: Attempt to access the route /api/vehicles as before, only this time add the header "Authorization" with the value "JWT" followed by a space, followed by the returned "token" that was sent when "bob" logged in (above)
Expected Result: Vehicle data is returned
Action: Attempt to access the route /api/vehicles again, only this time slightly modify the JWT (ie: remove/add a character).
Expected Result: Server returns a 401 error code and the text "unauthorized".