Authentication (Logging In)
Authentication can be a very complex topic, especially when working with Next.js. This is largely due to the amount of freedom and options that Next.js makes available to developers.
For example, some pages may be pre-rendered using Server Side Rendering (SSR) while others may be rendered on the client side (CSR). Even Incremental Static Regeneration is possible, allowing static pages to be created / updated after the site is built. Not to mention the ability for developers to write their own API's within Next.js, as well utilize the (now stable) Middleware functionality to execute code before a request is completed.
For our examples however, we will try to keep things as straightforward as possible, primarily using code that we have seen already.
As an exercise, we will and attempt to write code for a site that connects to the secure API that we created during the discussion on "Introduction to JWT".
Obtaining & Running the “vehicles-UI” Example
As a starting point download the Example Code, extract the files and open the "vehicles-UI" folder in Visual Studio Code. You will notice that this folder contains a my-app folder with the code for a Next.js app with two pages: "Home" (index.js) and "Vehicles" (vehicles.js).
Before we can run this app however, we must first:
Ensure that the completed example from Introduction to JWT (ie: "simple-API-complete") is currently running on port 8080.
Open the "vehicles-UI/my-app" folder in the integrated terminal for Visual Studio code and execute the command "npm install" to obtain the dependencies
With the dependencies installed and node_modules rebuilt, we can now start up our app with "npm run dev". You will see that we only have two routes available to the user: “Home” and “Vehicles”. If we try to access the “Vehicles” route, we will not see any data due to a 401 - Unauthorized error returned from our “simple-API-complete” (this can be confirmed in the browser console).
NOTE: This sample app makes use of the UI components from React Bootstrap. This was accomplished by installing "react-bootstrap" and "bootstrap" from NPM and adding the following "import" statement in "_app.js":
import 'bootstrap/dist/css/bootstrap.min.css';
Building an "Authentication" Library
Since we will be handling authentication and working with JWT, it makes the most sense to have all of our “Authentication” related code in one place. For this example, we will be creating a new folder under "/my-app" called "lib". Within the "lib" folder, create a file called "authenticate.js". Within this file, we will place code that is responsible for:
Executing a "POST" request using "fetch()" to the "api/login" route of our server with a given user / password.
Storing / Removing the obtained JWT locally
Reading the contents of the JWT
Determining whether or not the user is “authenticated” after logging in
Function: authenticateUser()
The first function that we will create in "authenticate.js" is called "authenticateUser" and will attempt to obtain a JWT from our "simple-API-complete" server at the route "/api/login", given a specific user and password. This function must be "async" since it's making use of the asynchronous "fetch()" function. Additionally, it must only store the token locally if the status code from "/api/login" is 200, otherwise the function must throw a new Error, with the error message sent from the API:
export async function authenticateUser(user, password) {
  const res = await fetch(`${process.env.NEXT_PUBLIC_API_URL}/login`, {
    method: 'POST',
    body: JSON.stringify({ userName: user, password: password }),
    headers: {
      'content-type': 'application/json',
    },
  });

  const data = await res.json();

  if (res.status === 200) {
    setToken(data.token);
    return true;
  } else {
    throw new Error(data.message);
  }
}
Notice the url used in the "fetch" call references "process.env.NEXT_PUBLIC_API_URL". The value for this constant is provided in the "/my-app/.env" file:
NEXT_PUBLIC_API_URL="http://localhost:8080/api"
NOTE: Environment variables in Next.js use the following naming convention:
.env: Defines environment variables, to be loaded in code using "process.env" (this is true for all .env files)
.env.local: Defines "secrets" (tokens, etc) and is meant to be excluded from your code repository (ie: added to .gitignore)
.env.development: Defines environment variables to be used in the development environment
.env.production: Defines environment variables to be used in the production environment
.env.test: Defines environment variables to be used in the test environment
Additionally, in order to make your environment variables available in the browser, they must be prefixed with the text NEXT_PUBLIC_ as in our example: "NEXT_PUBLIC_API_URL".
Function: setToken()
This function is designed explicitly to store the token. It is used by the above "authenticateUser" as well as elsewhere through our application:
function setToken(token) {
  localStorage.setItem('access_token', token);
}
You will notice that in this case, we have chosen to persist the token using "localStorage" with the key "access_token"
Local Storage
From MDN:
The localStorage read-only property of the window interface allows you to access a Storage object for the Document's origin; the stored data is saved across browser sessions.
Essentially, we are storing the value of the token in the browser for retrieval at a later date / time. This is in contrast to keeping it stored in memory, as we do not wish for the user to be logged out if the page is refreshed and the app is reloaded.
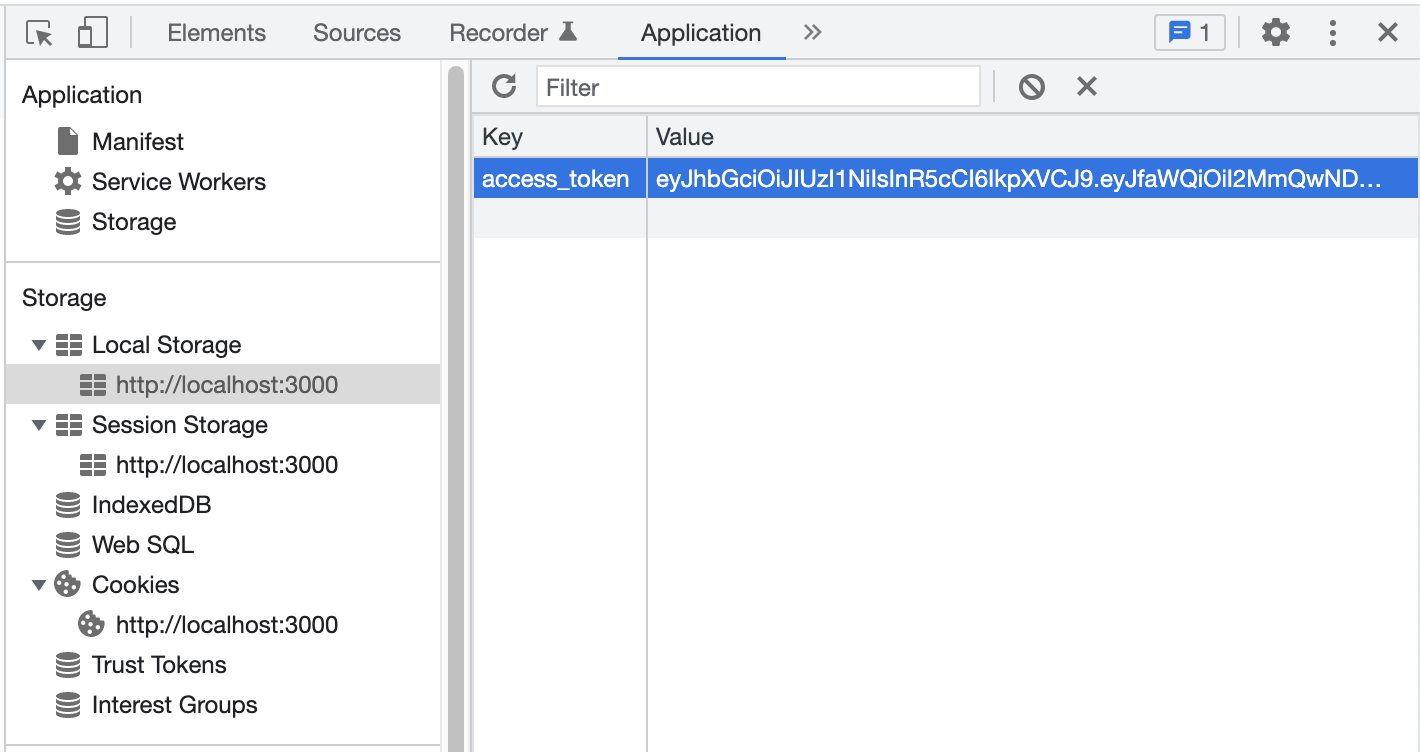
To view all values currently stored in "localStorage" (as well as "sessionStorage" "cookies", etc.) using Chrome, you can access the dev tools and open the "Application" tab. You will find the values under "Storage":
Function: getToken()
Similar to "setToken()" above, this function is designed explicitly to retrieve the token from "localStorage" using getItem(). If the token does not exist, this function returns null:
export function getToken() {
  try {
    return localStorage.getItem('access_token');
  } catch (err) {
    return null;
  }
}
In this case, we place the "getItem()" call within a try / catch block. This helps us deal with the possibility of encountering "ReferenceError: localStorage is not defined" when a page / pages using getToken() are pre-rendered by Next.js.
Function: removeToken()
This is the final function that works directly with "localStorage" - it simply removes the token from localStorage using removeItem().
export function removeToken() {
  localStorage.removeItem('access_token');
}
Function: readToken()
The purpose of the readToken() function is to obtain the payload from the JWT (This is the data that was digitally signed on our server, ie: "_id" and "userName"). This is accomplished by first retrieving the token from localStorage (using getToken()), followed by reading the token using "jwtDecode" (available from npm and installed using "npm i jwt-decode"):
import { jwtDecode } from 'jwt-decode';

// ...

export function readToken() {
  try {
    const token = getToken();
    return token ? jwtDecode(token) : null;
  } catch (err) {
    return null;
  }
}
Function: isAuthenticated()
The final function defined within our "authenticate.js" lib, serves to determine whether or not the current user is "authenticated". In this case, we simply attempt to read the token (readToken()). If a value is returned, return true otherwise, return false. This will be used primarily to determine whether or not a user is allowed to proceed to a specific route / page.
export function isAuthenticated() {
  const token = readToken();
  return token ? true : false;
}
Creating a "Login" Page
With our "authenticate.js" lib complete, we can now concentrate on implementing a User Interface which enables users to enter their credentials and attempt to "log in" (acquire the JWT).
To begin, we will create a login.js file within the "pages" directory.
Form Components
Since we're using "React Bootstrap", we can leverage some of their components to make a login form that matches the rest of the site:
import { Card, Form, Button } from "react-bootstrap";

export default function Login(props){
  return (
    <>
      <Card bg="light">
        <Card.Body><h2>Login</h2>Enter your login information below:</Card.Body>
      </Card>
      <br />
      <Form>
        <Form.Group>
          <Form.Label>User:</Form.Label><Form.Control type="text" id="userName" name="userName" />
        </Form.Group>
        <br />
        <Form.Group>
          <Form.Label>Password:</Form.Label><Form.Control type="password" id="password" name="password" />
        </Form.Group>
        <br />
        <Button variant="primary" className="pull-right" type="submit">Login</Button>
      </Form>
    </>
  );
}
Capturing User Input
During the initial discussion on Forms in React, the concept of "Controlled Components" was first introduced, followed closely by "React Hook Form". While it was established that React Hook Form is an excellent alternative to "Controlled Components" (in terms of flexibility, ease of use, etc.), it is not required in this case. This is because we only have two simple input fields and all error messages related to logging in come from the API, so client-side validation is not strictly necessary.
Recall, to capture form data using "Controlled Components", we must include:
- Form field values within the "state":
import { useState } from 'react';

// ...

const [user, setUser] = useState('');
const [password, setPassword] = useState('');
- A Function to handle form submissions:
function handleSubmit(e) {
  e.preventDefault();
  console.log('TODO: Submit Form');
}
- Updated form fields to synchronize with the "state" values (implemented by adding a "value" property and an "onChange" event):
<Form.Control type="text" value={user} id="userName" name="userName" onChange={e => setUser(e.target.value)} />
<Form.Control type="password" value={password} id="password" name="password" onChange={e => setPassword(e.target.value)} />
- Update the "Form" component to use the "onSubmit" event:
<Form onSubmit={handleSubmit}>
</form>
If we apply all of these changes to our form, we should have the following code. When the form is submitted, the values for user and password are available in the state:
import { Card, Form, Button } from "react-bootstrap";
import { useState } from 'react';

export default function Login(props){

  const [user, setUser] = useState("");
  const [password, setPassword] = useState("");

  function handleSubmit(e) {
    e.preventDefault();
    console.log(`TODO: Submit Form with: ${user} / ${password}`)
  }
  return (
    <>
      <Card bg="light">
        <Card.Body><h2>Login</h2>Enter your login information below:</Card.Body>
      </Card>
      <br />
      <Form onSubmit={handleSubmit}>
        <Form.Group>
          <Form.Label>User:</Form.Label><Form.Control type="text" value={user} id="userName" name="userName" onChange={e => setUser(e.target.value)} />
        </Form.Group>
        <br />
        <Form.Group>
          <Form.Label>Password:</Form.Label><Form.Control type="password" value={password} id="password" name="password" onChange={e => setPassword(e.target.value)} />
        </Form.Group>
        <br />
        <Button variant="primary" className="pull-right" type="submit">Login</Button>
      </Form>
    </>
  );
}
Authenticating the User / Showing Errors
The final piece for our "Login" component is to make use of "authenticate.js" to actually authenticate the user with the data entered in the form. If the user enters correct credentials, we will redirect them to the "/vehicles" route, however if invalid credentials have been entered, we must show an error message to the user. This will involve:
- Including the "authenticateUser" function from our "authenticate.js" lib as well as the "useRouter" hook from "next/router":
import { authenticateUser } from '@/lib/authenticate';
import { useRouter } from 'next/router';
- Adding a "warning" string in the "state" to display a login error to the user (if applicable) as well as invoking the "useRouter" hook to get an instance of "router"
const [warning, setWarning] = useState('');
const router = useRouter();
- Updating "handleSubmit" to use "authenticateUser" and update "warning" if it fails or redirect to "/vehicles" if it succeeds:
async function handleSubmit(e) {
  e.preventDefault();
  try {
    await authenticateUser(user, password);
    router.push('/vehicles');
  } catch (err) {
    setWarning(err.message);
  }
}
- Adding an "Alert" Component and conditionally showing the warning message:
import { Card, Form, Alert, Button } from 'react-bootstrap';

// ...

{ warning && ( <><br /><Alert variant="danger">{warning}</Alert></> )}
Adding an "Authorization" Header to SWR
If we test the app at this point, we should see that our "/login" page correctly shows errors, as well as redirects to "/vehicles" when appropriate (credentials have been accepted). You can also verify that the token has been correctly added as "access_token" in local storage.
The only piece missing is ensuring that the "access_token" (JWT) is correctly added to an "Authorization" header, when making a request for vehicles from our API.
At the moment, the code to make a request in "pages/vehicles.js" currently looks like:
const fetcher = (url) => fetch(url).then((res) => res.json());

//...

const { data, error } = useSWR(`${process.env.NEXT_PUBLIC_API_URL}/vehicles`, fetcher);
We do not have any code to specify a header, nor do we have any way of accessing the token from local_storage within this component.
This can be easily fixed however, by updating the "fetcher" function:
import { getToken } from "@/lib/authenticate";

// ...

const fetcher = (url) => fetch(url, { headers: { Authorization: `JWT ${getToken()}` }}).then((res) => res.json());
If we test the route now, we should see that the correct header has been added to our request and we can indeed see the vehicles rendered on the page.